×

使用圆形进度条的电位器的值

消耗积分:2 | 格式:zip | 大小:0.18 MB | 2023-02-02

分享资料个

描述

介绍

经过一段时间的分析,我在这里继续用另一种方式来表示电位器的模拟值,这次我想体验一个3.5“TFT LCD,我喜欢它的尺寸和可以表示的各种颜色。它是一个组件值得一些项目拥有。当然,这个文档也是关于模拟值的传奇的一部分。

图表

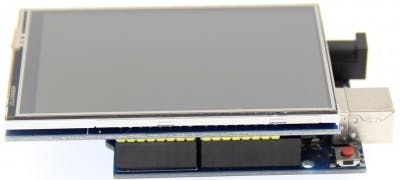
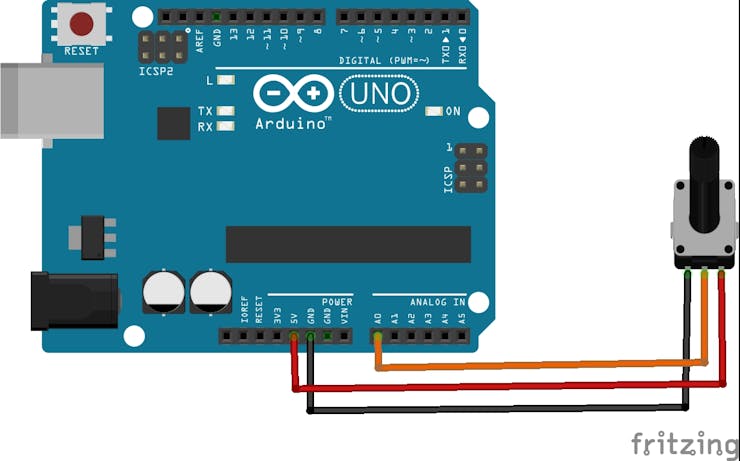
要开发这个项目,不需要复杂的连接或图表,因为电位器必须连接到引脚 A0,然后按照图像参考将屏幕安装在 Arduino UNO 上。
diagram_iu5JLJ7OdV.jpg?auto=compress%2Cformat&w=740&h=555&fit=max
 
image_YuZ0xPToZY.png?auto=compress%2Cformat&w=740&h=555&fit=max
图片来自 LCDwiki
 

另一个重要的细节:必要的库是LCDWIKI_GUI.hLCDWIKI_KBV,我喜欢这些库的地方在于易于设计引人注目的元素、文本和背景。

代码的系统

我们包括必要的图形库以使用屏幕并表示必要的形式。

#include  //Core graphics library
#include  //Hardware-specific library

接下来我们为各自的库构建屏幕。

LCDWIKI_KBV my_lcd(ILI9486,A3,A2,A1,A0,A4);

我们定义要使用的颜色。

#define  BLACK   0x0000
#define RED     0xF800
#define GREY 0x2104 // Dark grey 16 bit colour
#define GREEN 0x07E0
#define WHITE 0xFFFF
#define BLUE 0x001F
// Meter colour schemes
#define RED2RED 0
#define GREEN2GREEN 1
#define BLUE2BLUE 2
#define BLUE2RED 3
#define GREEN2RED 4
#define RED2GREEN 5

我们设置变量来控制时间并存储模拟读数的值。

uint32_t runTime = -99999; // time for next update
int reading = 0; // Value to be displayed

现在,在下面几行设置代码中,我们分别初始化屏幕、设置深色背景和设置屏幕旋转方向。

void setup() {
  my_lcd.Init_LCD();
  my_lcd.Fill_Screen(0x0);
  my_lcd.Set_Rotation(1);
}

ringMeter 函数是代码的核心,内部应用数学公式创建各种三角形,两个顶点在内弧上,另一个顶点在外弧上,然后生成一个倒三角形。各种三角形的生成允许构建圆形条并逐渐将颜色应用于它。然后生成居中文本的表示,为此考虑了它所具有的图形数量。

int ringMeter(int value, int vmin, int vmax, int x, int y, int r, byte scheme){
  // Minimum value of r is about 52 before value text intrudes on ring
  // drawing the text first is an option
  x += r; y += r;   // Calculate coords of centre of ring
  int w = r / 4;    // Width of outer ring is 1/4 of radius
  int angle = 150;  // Half the sweep angle of meter (300 degrees)
  int text_colour = 0; // To hold the text colour
  int v = map(value, vmin, vmax, -angle, angle); // Map the value to an angle v
  byte seg = 5; // Segments are 5 degrees wide = 60 segments for 300 degrees
  byte inc = 5; // Draw segments every 5 degrees, increase to 10 for segmented ring
  // Draw colour blocks every inc degrees

  for (int i = -angle; i < angle; i += inc) {
    // Choose colour from scheme
    int colour = 0;
    switch (scheme) {
      case 0: colour = RED; break; // Fixed colour
      case 1: colour = GREEN; break; // Fixed colour
      case 2: colour = BLUE; break; // Fixed colour
      case 3: colour = rainbow(map(i, -angle, angle, 0, 127)); break; // Full spectrum blue to red
      case 4: colour = rainbow(map(i, -angle, angle, 63, 127)); break; // Green to red (high temperature etc)
      case 5: colour = rainbow(map(i, -angle, angle, 127, 63)); break; // Red to green (low battery etc)
      default: colour = BLUE; break; // Fixed colour
    }
    
    // Calculate pair of coordinates for segment start
    float sx = cos((i - 90) * 0.0174532925);
    float sy = sin((i - 90) * 0.0174532925);
    uint16_t x0 = sx * (r - w) + x;
    uint16_t y0 = sy * (r - w) + y;
    uint16_t x1 = sx * r + x;
    uint16_t y1 = sy * r + y;

    // Calculate pair of coordinates for segment end
    float sx2 = cos((i + seg - 90) * 0.0174532925);
    float sy2 = sin((i + seg - 90) * 0.0174532925);
    int x2 = sx2 * (r - w) + x;
    int y2 = sy2 * (r - w) + y;
    int x3 = sx2 * r + x;
    int y3 = sy2 * r + y;
    if (i < v) { // Fill in coloured segments with 2 triangles
      my_lcd.Set_Draw_color(colour);
      my_lcd.Fill_Triangle(x0, y0, x1, y1, x2, y2);
      my_lcd.Fill_Triangle(x1, y1, x2, y2, x3, y3);
      text_colour = colour; // Save the last colour drawn
    }
    else // Fill in blank segments
    {
      my_lcd.Set_Draw_color(GREY);
      my_lcd.Fill_Triangle(x0, y0, x1, y1, x2, y2);
      my_lcd.Fill_Triangle(x1, y1, x2, y2, x3, y3);
    }
  }

  // Convert value to a string
  char buf[10];
  byte len = 4; if (value > 999) len = 5;
  dtostrf(value, len, 0, buf);
  my_lcd.Set_Draw_color(0, 0,0);
  my_lcd.Fill_Rectangle(x-60, y-15, x+60, y+20);
  
  // Set the text colour to default
  my_lcd.Set_Text_colour(WHITE);
  my_lcd.Set_Text_Back_colour(BLACK);
  my_lcd.Set_Text_Size(5);
  if (value>999){
    my_lcd.Print_String(String(value), x-60, y-15);
  } else if (value>99 && value<1000){
    my_lcd.Print_String(String(value), x-45, y-15);
  } else if (value>9 && value<100){
    my_lcd.Print_String(String(value), x-30, y-15);
  } else {
    my_lcd.Print_String(String(value), x-15, y-15);
  }
  return x + r;
}

彩虹功能允许您设置用于圆形条的颜色变化。

unsigned int rainbow(byte value){
  // Value is expected to be in range 0-127
  // The value is converted to a spectrum colour from 0 = blue through to 127 = red
  byte red = 0; // Red is the top 5 bits of a 16 bit colour value
  byte green = 0;// Green is the middle 6 bits
  byte blue = 0; // Blue is the bottom 5 bits
  byte quadrant = value / 32;
  if (quadrant == 0) {
    blue = 31;
    green = 2 * (value % 32);
    red = 0;
  }
  if (quadrant == 1) {
    blue = 31 - (value % 32);
    green = 63;
    red = 0;
  }
  if (quadrant == 2) {
    blue = 0;
    green = 63;
    red = value % 32;
  }
  if (quadrant == 3) {
    blue = 0;
    green = 63 - 2 * (value % 32);
    red = 31;
  }
  return (red << 11) + (green << 5) + blue;
}

在循环期间,您需要从电位器读取模拟信号,然后调用 ringmeter 函数进行绘图。

void loop() {
  if (millis() - runTime >= 100L) {
    runTime = millis();
    // Set the position, gap between meters, and inner radius of the meters
    int gap = 4, radius = 120, xpos = my_lcd.Get_Display_Width()/2-radius, ypos = my_lcd.Get_Display_Height()/2-radius;
    int value = analogRead(A5); // read of potentiometer value
    xpos = gap + ringMeter(value, 0, 1020, xpos, ypos, radius, GREEN2RED); // Draw analogue meter
  }
}

结论

所有与用户交互的项目都允许欣赏与代码的各种交互,尤其是这个项目让我探索了 TFT 屏幕的使用、它的颜色甚至基本的图形元素。3.5 英寸的屏幕非常漂亮且易于使用,一旦您从制造商那里获得了技术信息,您仍然可以分享您使用此屏幕的体验。


声明:本文内容及配图由入驻作者撰写或者入驻合作网站授权转载。文章观点仅代表作者本人,不代表电子发烧友网立场。文章及其配图仅供工程师学习之用,如有内容侵权或者其他违规问题,请联系本站处理。 举报投诉

评论(0)
发评论

下载排行榜

全部0条评论

快来发表一下你的评论吧 !

'+ '

'+ '

'+ ''+ '
'+ ''+ ''+ '
'+ ''+ '' ); $.get('/article/vipdownload/aid/'+webid,function(data){ if(data.code ==5){ $(pop_this).attr('href',"/login/index.html"); return false } if(data.code == 2){ //跳转到VIP升级页面 window.location.href="//m.lene-v.com/vip/index?aid=" + webid return false } //是会员 if (data.code > 0) { $('body').append(htmlSetNormalDownload); var getWidth=$("#poplayer").width(); $("#poplayer").css("margin-left","-"+getWidth/2+"px"); $('#tips').html(data.msg) $('.download_confirm').click(function(){ $('#dialog').remove(); }) } else { var down_url = $('#vipdownload').attr('data-url'); isBindAnalysisForm(pop_this, down_url, 1) } }); }); //是否开通VIP $.get('/article/vipdownload/aid/'+webid,function(data){ if(data.code == 2 || data.code ==5){ //跳转到VIP升级页面 $('#vipdownload>span').text("开通VIP 免费下载") return false }else{ // 待续费 if(data.code == 3) { vipExpiredInfo.ifVipExpired = true vipExpiredInfo.vipExpiredDate = data.data.endoftime } $('#vipdownload .icon-vip-tips').remove() $('#vipdownload>span').text("VIP免积分下载") } }); }).on("click",".download_cancel",function(){ $('#dialog').remove(); }) var setWeixinShare={};//定义默认的微信分享信息,页面如果要自定义分享,直接更改此变量即可 if(window.navigator.userAgent.toLowerCase().match(/MicroMessenger/i) == 'micromessenger'){ var d={ title:'使用圆形进度条的电位器的值',//标题 desc:$('[name=description]').attr("content"), //描述 imgUrl:'https://'+location.host+'/static/images/ele-logo.png',// 分享图标,默认是logo link:'',//链接 type:'',// 分享类型,music、video或link,不填默认为link dataUrl:'',//如果type是music或video,则要提供数据链接,默认为空 success:'', // 用户确认分享后执行的回调函数 cancel:''// 用户取消分享后执行的回调函数 } setWeixinShare=$.extend(d,setWeixinShare); $.ajax({ url:"//www.lene-v.com/app/wechat/index.php?s=Home/ShareConfig/index", data:"share_url="+encodeURIComponent(location.href)+"&format=jsonp&domain=m", type:'get', dataType:'jsonp', success:function(res){ if(res.status!="successed"){ return false; } $.getScript('https://res.wx.qq.com/open/js/jweixin-1.0.0.js',function(result,status){ if(status!="success"){ return false; } var getWxCfg=res.data; wx.config({ //debug: true, // 开启调试模式,调用的所有api的返回值会在客户端alert出来,若要查看传入的参数,可以在pc端打开,参数信息会通过log打出,仅在pc端时才会打印。 appId:getWxCfg.appId, // 必填,公众号的唯一标识 timestamp:getWxCfg.timestamp, // 必填,生成签名的时间戳 nonceStr:getWxCfg.nonceStr, // 必填,生成签名的随机串 signature:getWxCfg.signature,// 必填,签名,见附录1 jsApiList:['onMenuShareTimeline','onMenuShareAppMessage','onMenuShareQQ','onMenuShareWeibo','onMenuShareQZone'] // 必填,需要使用的JS接口列表,所有JS接口列表见附录2 }); wx.ready(function(){ //获取“分享到朋友圈”按钮点击状态及自定义分享内容接口 wx.onMenuShareTimeline({ title: setWeixinShare.title, // 分享标题 link: setWeixinShare.link, // 分享链接 imgUrl: setWeixinShare.imgUrl, // 分享图标 success: function () { setWeixinShare.success; // 用户确认分享后执行的回调函数 }, cancel: function () { setWeixinShare.cancel; // 用户取消分享后执行的回调函数 } }); //获取“分享给朋友”按钮点击状态及自定义分享内容接口 wx.onMenuShareAppMessage({ title: setWeixinShare.title, // 分享标题 desc: setWeixinShare.desc, // 分享描述 link: setWeixinShare.link, // 分享链接 imgUrl: setWeixinShare.imgUrl, // 分享图标 type: setWeixinShare.type, // 分享类型,music、video或link,不填默认为link dataUrl: setWeixinShare.dataUrl, // 如果type是music或video,则要提供数据链接,默认为空 success: function () { setWeixinShare.success; // 用户确认分享后执行的回调函数 }, cancel: function () { setWeixinShare.cancel; // 用户取消分享后执行的回调函数 } }); //获取“分享到QQ”按钮点击状态及自定义分享内容接口 wx.onMenuShareQQ({ title: setWeixinShare.title, // 分享标题 desc: setWeixinShare.desc, // 分享描述 link: setWeixinShare.link, // 分享链接 imgUrl: setWeixinShare.imgUrl, // 分享图标 success: function () { setWeixinShare.success; // 用户确认分享后执行的回调函数 }, cancel: function () { setWeixinShare.cancel; // 用户取消分享后执行的回调函数 } }); //获取“分享到腾讯微博”按钮点击状态及自定义分享内容接口 wx.onMenuShareWeibo({ title: setWeixinShare.title, // 分享标题 desc: setWeixinShare.desc, // 分享描述 link: setWeixinShare.link, // 分享链接 imgUrl: setWeixinShare.imgUrl, // 分享图标 success: function () { setWeixinShare.success; // 用户确认分享后执行的回调函数 }, cancel: function () { setWeixinShare.cancel; // 用户取消分享后执行的回调函数 } }); //获取“分享到QQ空间”按钮点击状态及自定义分享内容接口 wx.onMenuShareQZone({ title: setWeixinShare.title, // 分享标题 desc: setWeixinShare.desc, // 分享描述 link: setWeixinShare.link, // 分享链接 imgUrl: setWeixinShare.imgUrl, // 分享图标 success: function () { setWeixinShare.success; // 用户确认分享后执行的回调函数 }, cancel: function () { setWeixinShare.cancel; // 用户取消分享后执行的回调函数 } }); }); }); } }); } function openX_ad(posterid, htmlid, width, height) { if ($(htmlid).length > 0) { var randomnumber = Math.random(); var now_url = encodeURIComponent(window.location.href); var ga = document.createElement('iframe'); ga.src = 'https://www1.elecfans.com/www/delivery/myafr.php?target=_blank&cb=' + randomnumber + '&zoneid=' + posterid+'&prefer='+now_url; ga.width = width; ga.height = height; ga.frameBorder = 0; ga.scrolling = 'no'; var s = $(htmlid).append(ga); } } openX_ad(828, '#berry-300', 300, 250);