×

使用RGB LED和Netduino显示彩虹色

消耗积分:2 | 格式:zip | 大小:0.26 MB | 2022-11-08

分享资料个

描述

该项目使用Netduino.Foundation库中包含的RgbPwmLed类。本指南由三部分组成:

  • 第 1 部分:循环检查 RGB LED 上的红色、绿色和蓝色引脚,以确保它们正确接线。
  • 第 2 部分:只需几行代码,即可使 LED 发出所有可能的颜色。

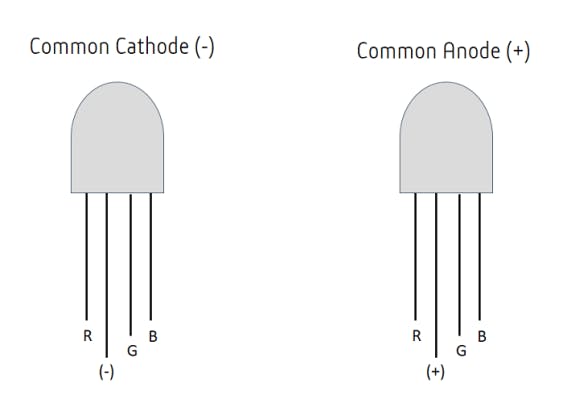
RGB(红、绿、蓝)LED灯是具有四个腿的二极管 - 一个用于提到的每种颜色,一个用于共阴极(接地)或共阳极 (vcc),这也是最长的一个。
 
pYYBAGNomZ6AWC4wAAAkjYM8I8s842.png
共阴极和共阳极 RGB LED
 

在这个项目中,您可以使用共阳极或共阴极 RGB LED。只需确保构建与您使用的 LED 对应的电路即可。

Netduino.Foundation是一个使用 Netduino 上的 .NET MicroFramework 快速构建连接事物的平台。Wilderness Labs创建,它是开源的,由 Netduino 社区维护。

如果您是 Netduino 开发新手,我建议您转到Netduino 入门项目以正确设置您的开发环境。

组装电路

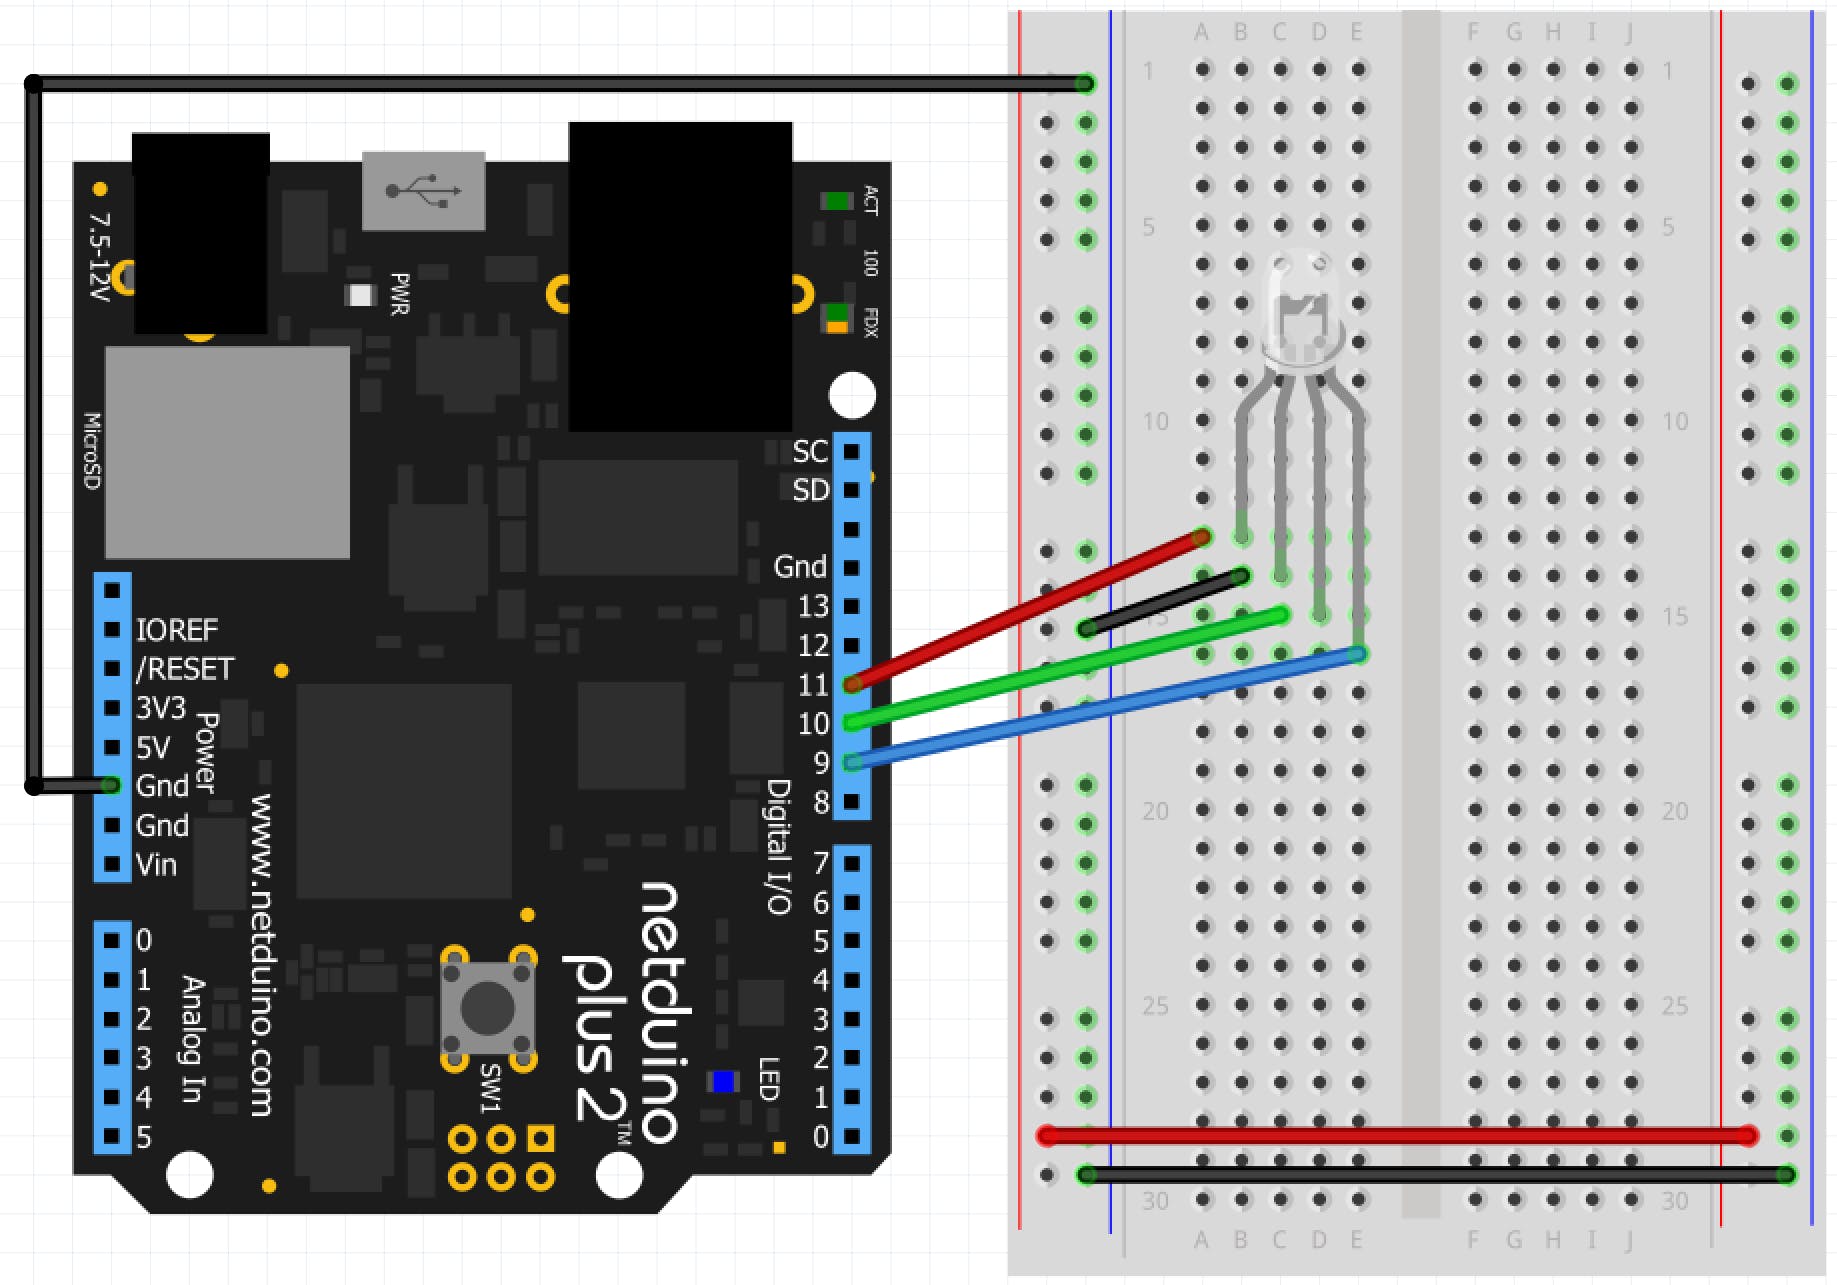
共阴极RGB LED

 
pYYBAGNomaSAESgEAALQPHokmIs729.png
共阴极RGB LED电路
 

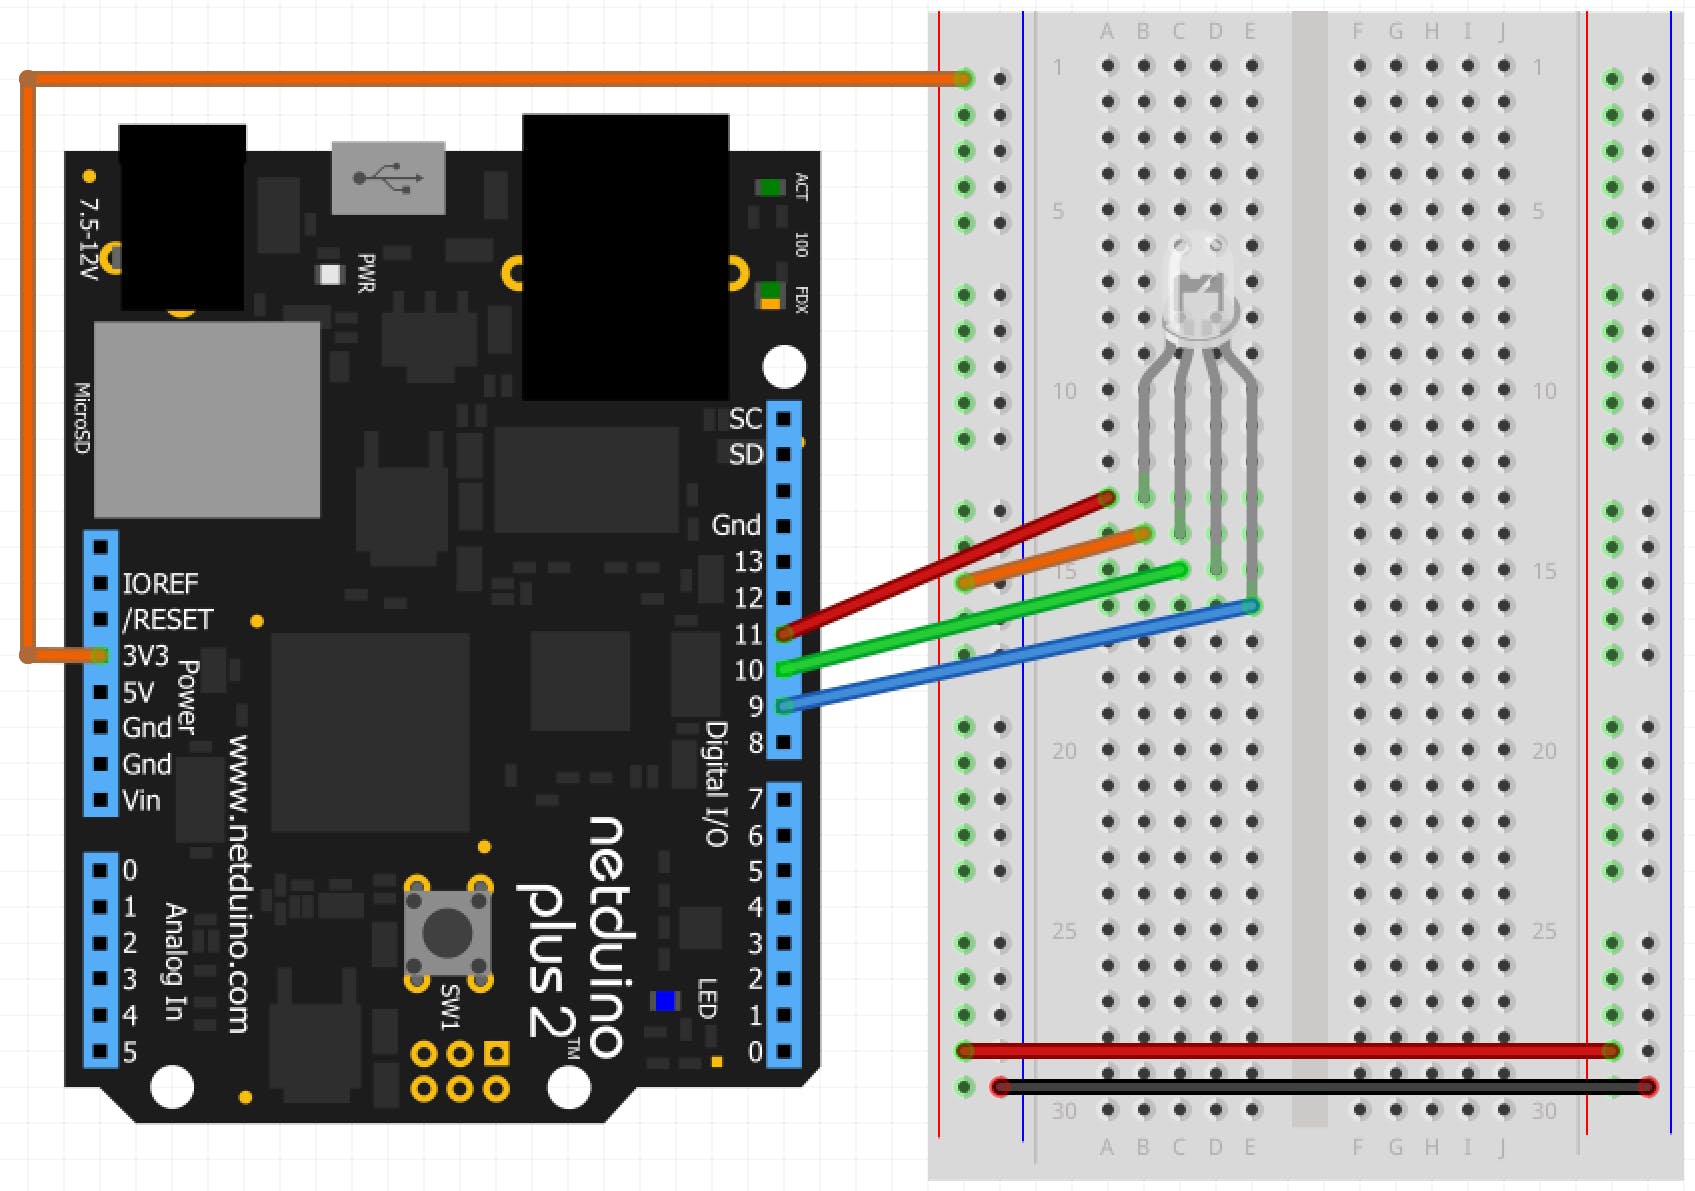
共阳极 RGB LED

 
poYBAGNomaiAdUp-AALINI9_mXY023.png
共阳极RGB LED电路
 

注意:请注意,两个电路中都没有使用电阻器。通常,通过全电压会烧毁 LED。但是,Netduino.Foundation可以使用 PWM 信号自动控制正向电压。

创建一个 Netduino 项目

在 Visual Studio 2015 for Windows 或最新的 Visual Studio for Mac 中创建 Netduino 项目;将项目命名为RgbPwmLed

添加 Netduino.Foundation NuGet 包

视窗

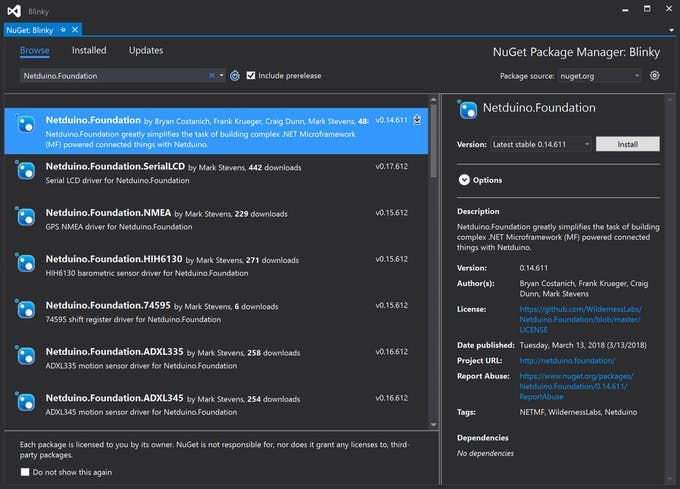
右键单击您的RgbPwmLed项目,然后单击Manage NuGet Packages 浏览选项卡中,搜索Netduino.Foundation;它应该是第一个搜索结果。单击安装按钮。
 
pYYBAGNomWqAEDA1AACr4qxL74Q42.jpeg
 

苹果系统

在解决方案资源管理器中按住 Alt 键单击您的RgbPwmLed项目,然后单击添加 => 添加 Nuget 包以打开 NuGet 包窗口。搜索Netduino.Foundation包并单击Add Package将其添加到您的项目中。
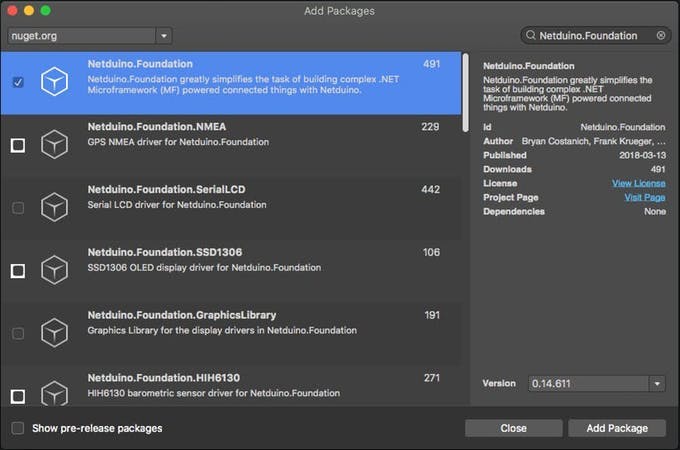
 
poYBAGNoma-AG0h7AAB8PGdq7A408.jpeg
 

第 1 部分:使 RGB LED 发出红色、绿色和蓝色光

Program.cs文件中,粘贴以下代码:

using Microsoft.SPOT;
using Netduino.Foundation;
using System.Threading;
using N = SecretLabs.NETMF.Hardware.Netduino;
namespace RgbPwmLed
{
   public class Program
   {
       public static void Main()
       {
           // create a new pwm controlled RGB LED on pins 
           // Red = 11, Green = 10, and Blue = 9.
           var rgbPwmLed = new Netduino.Foundation.LEDs.RgbPwmLed(
             N.PWMChannels.PWM_PIN_D11,
             N.PWMChannels.PWM_PIN_D10,
             N.PWMChannels.PWM_PIN_D9,
             2.1f,
             3.0f,
             3.0f, 
             false);
           // run forever
           while (true)
           {
               rgbPwmLed.SetColor(Color.FromHex("#FF0000"));
               Debug.Print("=========== RED! ===========");
               Thread.Sleep(1000);
               rgbPwmLed.SetColor(Color.FromHex("#00FF00"));
               Debug.Print("=========== GREEN! ===========");
               Thread.Sleep(1000);
               rgbPwmLed.SetColor(Color.FromHex("#0000FF"));
               Debug.Print("=========== BLUE! ===========");
               Thread.Sleep(1000);
           }
       }
   }
}

Main方法中,我们创建了一个名为 rgbPwmLed 的新RgbPwmLed对象在构造函数中,我们指定用于控制 LED 的引脚。由于我们没有使用电阻,我们分别包含每个引脚的正向电压(红色为 2.1V,绿色和蓝色为 3.0V )。构造函数中的最后一个参数是可选的,它的布尔值isCommonCathode标志(默认为 true)。根据您正在处理的电路相应地设置此值。

现在使用rgbPwmLed对象,在一个 while 无限循环中,我们正在调用SetColor(Color color)方法,以十六进制代码传递红色、绿色和蓝色,并使线程休眠一秒钟。您还可以声明以 RGB 或 HSA 值指定的颜色,甚至是预定义的命名颜色。

此外,要跟踪 LED 上当前显示的颜色,您可以使用Debug.Print 指示程序始终显示的颜色,以确保正确连接所有 LED 支脚。

运行项目

单击 Visual Studio 中的运行按钮以查看 RGB LED 的运行情况!您应该会看到 LED 每秒循环显示红色、绿色和蓝色,如下图所示:

RGB LED 上的 Netduino 循环引脚
 

第 2 部分:使 RGB LED 通过所有色调发光

在这一部分中,让我们为项目增添一些趣味。让我们编写一个小算法来遍历色相光谱中所有 360 种可能的颜色。为什么是360?使用色相、饱和度、亮度和 Alpha 颜色模型,它具有圆柱形几何形状,并且在完全饱和度和 Alpha 值下经过每个度数,它将显示 RGB 光谱内的所有颜色。

删除While(true)循环内的代码,然后粘贴For循环。它应该如下所示:

...
while (true)
{
    // loop through the entire hue spectrum (360 degrees)
    for (int i = 0; i < 360; i++)
    {
        var hue = ((double)i / 360F);
        Debug.Print(hue.ToString());
        // set the color of the RGB
        rgbPwmLed.SetColor(Color.FromHsba(((double)i/360F), 1, 1));
        // for a fun, fast rotation through the hue spectrum:
        //Thread.Sleep (1);
        // for a moderate walk through the forest of colors;
        Thread.Sleep(10);
    }
}
...

在这个For中,我们声明了一个局部双色调并分配 i/360 的除法结果。之后,我们在rgbPwmLed对象上调用 SetColor (Color.FromHsba(hue, 1, 1))方法,最后做一个Thread.Sleep(10)以适中的速度查看所有颜色。

运行项目

现在运行项目时,应该会看到如下内容:


第 3 部分:使用 StartRunningColors 方法

您应该检查的另一个有用的 API 方法是StartRunningColors ,它包括传递一个颜色列表以及每个颜色的持续时间。以下代码片段使 LED 发光Color.White 1000ms (1s),然后Color.Aqua 500ms (0.5s),然后Color.ForrestGreen 1000ms (1s),最后Color.OrangeRed 500ms (0.5s)。

...
while (true)
{
    // run through various colors for 10 seconds
    rgbPwmLed.StartRunningColors(
        new System.Collections.ArrayList
        {
            Color.White,
            Color.Aqua,
            Color.ForestGreen,
            Color.OrangeRed
        }, 
        new int[] { 1000, 500, 1000, 500 });
    Thread.Sleep(10000);
}
...

运行项目

现在运行项目时,您会看到如下内容:

使用 StartRunningColors 的 RGB LED
 

我建议您查看RgbPwmLed 官方文档,这样您就可以看到还有哪些有趣的 API 方法可以让您在使用 RGB LED 时更轻松地工作。

查看 Netduino.Foundation!

就您可以使用 Netduino.Foundation 做的大量令人兴奋的事情而言,这个项目只是冰山一角。

  • 它带有一个庞大的外围驱动程序库,其中包含最常见的传感器和外围设备的驱动程序。
  • 外围驱动程序封装了核心逻辑并公开了一个简单、干净、现代的 API。
  • 这个项目得到了一个不断发展的社区的支持,该社区不断致力于构建很酷的互联事物,并且总是很高兴能帮助新人并讨论新项目。

参考


声明:本文内容及配图由入驻作者撰写或者入驻合作网站授权转载。文章观点仅代表作者本人,不代表电子发烧友网立场。文章及其配图仅供工程师学习之用,如有内容侵权或者其他违规问题,请联系本站处理。 举报投诉

评论(0)
发评论

下载排行榜

全部0条评论

快来发表一下你的评论吧 !

'+ '

'+ '

'+ ''+ '
'+ ''+ ''+ '
'+ ''+ '' ); $.get('/article/vipdownload/aid/'+webid,function(data){ if(data.code ==5){ $(pop_this).attr('href',"/login/index.html"); return false } if(data.code == 2){ //跳转到VIP升级页面 window.location.href="//m.lene-v.com/vip/index?aid=" + webid return false } //是会员 if (data.code > 0) { $('body').append(htmlSetNormalDownload); var getWidth=$("#poplayer").width(); $("#poplayer").css("margin-left","-"+getWidth/2+"px"); $('#tips').html(data.msg) $('.download_confirm').click(function(){ $('#dialog').remove(); }) } else { var down_url = $('#vipdownload').attr('data-url'); isBindAnalysisForm(pop_this, down_url, 1) } }); }); //是否开通VIP $.get('/article/vipdownload/aid/'+webid,function(data){ if(data.code == 2 || data.code ==5){ //跳转到VIP升级页面 $('#vipdownload>span').text("开通VIP 免费下载") return false }else{ // 待续费 if(data.code == 3) { vipExpiredInfo.ifVipExpired = true vipExpiredInfo.vipExpiredDate = data.data.endoftime } $('#vipdownload .icon-vip-tips').remove() $('#vipdownload>span').text("VIP免积分下载") } }); }).on("click",".download_cancel",function(){ $('#dialog').remove(); }) var setWeixinShare={};//定义默认的微信分享信息,页面如果要自定义分享,直接更改此变量即可 if(window.navigator.userAgent.toLowerCase().match(/MicroMessenger/i) == 'micromessenger'){ var d={ title:'使用RGB LED和Netduino显示彩虹色',//标题 desc:$('[name=description]').attr("content"), //描述 imgUrl:'https://'+location.host+'/static/images/ele-logo.png',// 分享图标,默认是logo link:'',//链接 type:'',// 分享类型,music、video或link,不填默认为link dataUrl:'',//如果type是music或video,则要提供数据链接,默认为空 success:'', // 用户确认分享后执行的回调函数 cancel:''// 用户取消分享后执行的回调函数 } setWeixinShare=$.extend(d,setWeixinShare); $.ajax({ url:"//www.lene-v.com/app/wechat/index.php?s=Home/ShareConfig/index", data:"share_url="+encodeURIComponent(location.href)+"&format=jsonp&domain=m", type:'get', dataType:'jsonp', success:function(res){ if(res.status!="successed"){ return false; } $.getScript('https://res.wx.qq.com/open/js/jweixin-1.0.0.js',function(result,status){ if(status!="success"){ return false; } var getWxCfg=res.data; wx.config({ //debug: true, // 开启调试模式,调用的所有api的返回值会在客户端alert出来,若要查看传入的参数,可以在pc端打开,参数信息会通过log打出,仅在pc端时才会打印。 appId:getWxCfg.appId, // 必填,公众号的唯一标识 timestamp:getWxCfg.timestamp, // 必填,生成签名的时间戳 nonceStr:getWxCfg.nonceStr, // 必填,生成签名的随机串 signature:getWxCfg.signature,// 必填,签名,见附录1 jsApiList:['onMenuShareTimeline','onMenuShareAppMessage','onMenuShareQQ','onMenuShareWeibo','onMenuShareQZone'] // 必填,需要使用的JS接口列表,所有JS接口列表见附录2 }); wx.ready(function(){ //获取“分享到朋友圈”按钮点击状态及自定义分享内容接口 wx.onMenuShareTimeline({ title: setWeixinShare.title, // 分享标题 link: setWeixinShare.link, // 分享链接 imgUrl: setWeixinShare.imgUrl, // 分享图标 success: function () { setWeixinShare.success; // 用户确认分享后执行的回调函数 }, cancel: function () { setWeixinShare.cancel; // 用户取消分享后执行的回调函数 } }); //获取“分享给朋友”按钮点击状态及自定义分享内容接口 wx.onMenuShareAppMessage({ title: setWeixinShare.title, // 分享标题 desc: setWeixinShare.desc, // 分享描述 link: setWeixinShare.link, // 分享链接 imgUrl: setWeixinShare.imgUrl, // 分享图标 type: setWeixinShare.type, // 分享类型,music、video或link,不填默认为link dataUrl: setWeixinShare.dataUrl, // 如果type是music或video,则要提供数据链接,默认为空 success: function () { setWeixinShare.success; // 用户确认分享后执行的回调函数 }, cancel: function () { setWeixinShare.cancel; // 用户取消分享后执行的回调函数 } }); //获取“分享到QQ”按钮点击状态及自定义分享内容接口 wx.onMenuShareQQ({ title: setWeixinShare.title, // 分享标题 desc: setWeixinShare.desc, // 分享描述 link: setWeixinShare.link, // 分享链接 imgUrl: setWeixinShare.imgUrl, // 分享图标 success: function () { setWeixinShare.success; // 用户确认分享后执行的回调函数 }, cancel: function () { setWeixinShare.cancel; // 用户取消分享后执行的回调函数 } }); //获取“分享到腾讯微博”按钮点击状态及自定义分享内容接口 wx.onMenuShareWeibo({ title: setWeixinShare.title, // 分享标题 desc: setWeixinShare.desc, // 分享描述 link: setWeixinShare.link, // 分享链接 imgUrl: setWeixinShare.imgUrl, // 分享图标 success: function () { setWeixinShare.success; // 用户确认分享后执行的回调函数 }, cancel: function () { setWeixinShare.cancel; // 用户取消分享后执行的回调函数 } }); //获取“分享到QQ空间”按钮点击状态及自定义分享内容接口 wx.onMenuShareQZone({ title: setWeixinShare.title, // 分享标题 desc: setWeixinShare.desc, // 分享描述 link: setWeixinShare.link, // 分享链接 imgUrl: setWeixinShare.imgUrl, // 分享图标 success: function () { setWeixinShare.success; // 用户确认分享后执行的回调函数 }, cancel: function () { setWeixinShare.cancel; // 用户取消分享后执行的回调函数 } }); }); }); } }); } function openX_ad(posterid, htmlid, width, height) { if ($(htmlid).length > 0) { var randomnumber = Math.random(); var now_url = encodeURIComponent(window.location.href); var ga = document.createElement('iframe'); ga.src = 'https://www1.elecfans.com/www/delivery/myafr.php?target=_blank&cb=' + randomnumber + '&zoneid=' + posterid+'&prefer='+now_url; ga.width = width; ga.height = height; ga.frameBorder = 0; ga.scrolling = 'no'; var s = $(htmlid).append(ga); } } openX_ad(828, '#berry-300', 300, 250);