
你的狗有没有在清晨叫醒你吃东西?您是否因为太忙不能按时回家而责怪自己没能喂饱饥饿的宠物?购买允许您通过互联网控制它的智能狗喂食器可能非常昂贵。那么,为什么不用一些廉价的电子元件来设计和构建您自己的智能狗喂食器呢?在本文中,我们将构建一个简单的 IoT 狗(或其他友好生物)喂食器,成本不到 30 美元,并且可以通过 IoT 软件远程控制。到本项目结束时,您将学习:
WeMos D1 Mini 是一款功能强大的联网开发板。这款小型开发板采用最流行且性价比最高的Wi-Fi 微芯片ESP8266 之一,使其成为任何初学者级别物联网项目的完美选择。

资料来源:WeMos 文档
WeMos D1 Mini 的一大优势是用户友好。它与 MicroPython、Arduino 和 nodemcu 完美兼容。此外,WeMos D1 Mini 与流行的Arduino IDE兼容,允许您开发程序并将程序上传到微控制器。
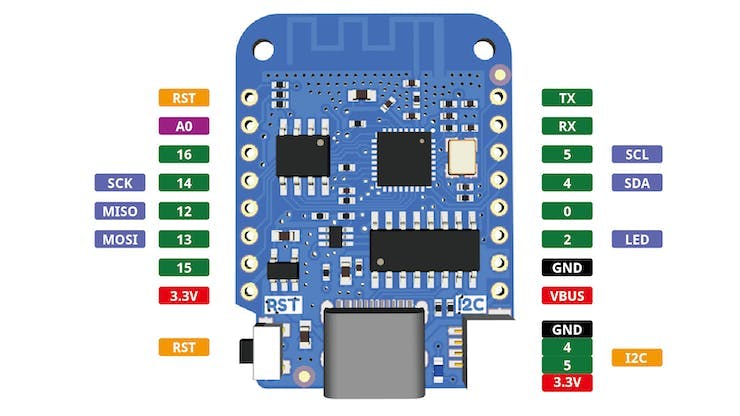
WeMos D1 Mini 开发板有11 个数字 I/O 引脚,一个 5V 引脚和一个 3.3V 引脚。在十一个数字 I/O 引脚中,有一个RX 引脚和一个用于串行通信的 TX 引脚。WeMos D1 迷你板上的每个引脚都在 3.3V 电压下运行,任何高于 3.3V 的电压都可能损坏开发板。如果你想将它与 5V 设备一起使用,你将需要一个逻辑电平转换器。
WeMos D1 Mini 开发板可以通过 USB 进行编程。不同版本的WeMos D1 Mini开发板USB接口不同。一些具有C 型 USB端口,而另一些具有微型 USB 端口。本教程中使用的 WeMos D1 Mini 板带有一个微型 USB 端口。
被动红外传感器,也称为热释电或IR 运动传感器,是一种小型廉价传感器,通过测量其检测范围内的物体发射或反射的红外辐射 (IR)量来检测运动。检测到的红外辐射水平取决于物体的热度。温度越高的物体发出的红外辐射越多。

资料来源:阿达果
PIR 运动传感器依靠热释电传感器来检测红外辐射水平。热释电传感器对热能的变化高度敏感,并在加热或冷却时产生电能。
PIR 运动传感器分为两个插槽。当活体动物经过运动传感器时,一侧会先于另一侧检测到移动物体。运动传感器两侧红外辐射水平的差异会产生正的差分变化。当运动物体离开检测区域时,运动传感器两侧会出现负微分变化。
为什么不同的 PIR 运动传感器具有不同的检测范围?答案在于运动传感器的球面透镜。PIR 运动检测器使用菲涅耳透镜将大范围的红外线聚集到传感器。在 PIR 运动检测器中,菲涅尔透镜被分成许多小部分,每个部分包含许多同心圆以将光线聚焦在一个点上。菲涅尔透镜的结构使 PIR 运动传感器能够检测大面积的运动。
让我们先谈谈如何使用每个电子元件并为这个项目搭建电路。
WeMos D1 Mini 有11 个数字 I/O 引脚、1 个模拟输入引脚 (A0) 、1 个 3.3V 引脚、1 个 5V 引脚和一个接地引脚。3.3V 引脚将用于为 PIR 运动传感器供电,5V 引脚用于伺服电机。WeMos D1 Mini 开发板可以通过微型 USB 进行编程和供电。您可以在此处熟悉 WeMos D1 Mini 。

资料来源:WEMOS 文档
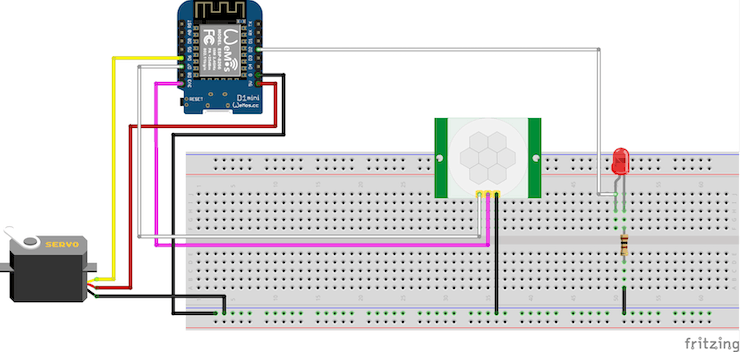
由于 WeMos D1 Mini 开发板只有一个接地引脚,我们需要使用面包板来创建更多。为此,通过将其中一个面包板电源轨连接到 WeMos D1 Mini 板的接地引脚,将其定义为接地。PIR 运动传感器、LED 和伺服电机的接地引脚可以连接到此电源导轨中的任何孔。
PIR 运动传感器具有三个接头引脚:接地(黑色)、信号输出(黄色)和 VCC(红色)。此 PIR 运动传感器的信号输出引脚应连接到 WeMos D1 迷你板上的数字 I/O 引脚之一。本教程中使用的 PIR 运动传感器需要 3.0V 的最小输入电压才能运行。因此,PIR 运动传感器的 VCC 引脚应连接到 3.3V 引脚。

资料来源:阿达果
注意:PIR 运动传感器可能对噪音高度敏感。WeMos D1 Mini 板的 Wi-Fi 信号可能会产生误触发。如果您遇到误触发问题,请尽量避免将您的 WeMos D1 Mini 放在靠近 PIR 运动传感器的位置。
小型伺服电机有三根线。黄色线是信号线,应连接到WeMos D1 Mini 板上的PWM 引脚。红线是电源线,应连接到微控制器的5V 引脚。棕色线为地线,应连接到WeMos D1 Mini开发板的地脚。

资料来源:Digikey/DFRobot
在这个项目中,红色 LED 用于指示PIR 运动传感器的状态。如果检测到移动,LED 将打开,如果没有移动,则关闭。红色 LED 由 WeMos D1 Mini 开发板上的数字引脚供电。
计算所需电阻值
I/O 引脚的输出电压:3.3 V
最大直流输出电流:12 mA(来源:https://diyi0t.com/esp8266-wemos-d1-mini-tutorial/)
LED 正向压降:1.7 V - 2 V3.3V - 2V = 1.3V1.3V / (12mA) = 108.333 欧姆(最接近的标准电阻值 = 100 欧姆)
您最终应该得到一个大致如下图所示的电路:


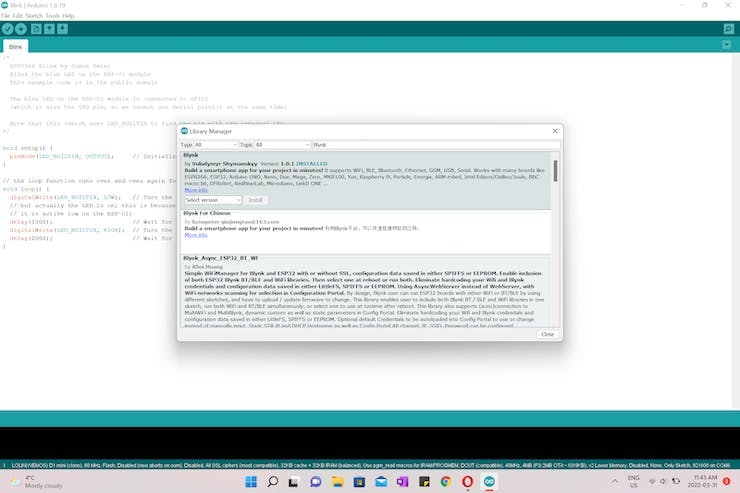
Blynk是一个非常流行的IoT 平台,可帮助您从 IOS 或 Android 设备管理 IoT 应用程序。该平台允许您通过互联网控制您的 Arduino、Raspberry PI 和其他微控制器。您将能够根据他们的免费计划完成此项目。为了使用 Blynk,您需要在 Arduino IDE中下载Blynk 库。
1. 打开 Arduino 集成开发环境。转到工具并选择管理库。2。在搜索栏中键入 Blynk.3。安装最新版本的可用库。
2. 在搜索栏中输入 Blynk。
3. 安装可用的最新版本库。

ESP8266 不是 Arduino 系列的一部分,因此我们需要安装一个附加组件才能在 Arduino IDE 上对其进行编程。要使用这个第三方硬件,我们需要安装 ESP8266 社区提供的插件。
1. 转到文件并选择首选项。
2. 复制以下 URL 并将其粘贴到其他 Board Manager URL字段中:
https://arduino.esp8266.com/stable/package_esp8266com_index.json
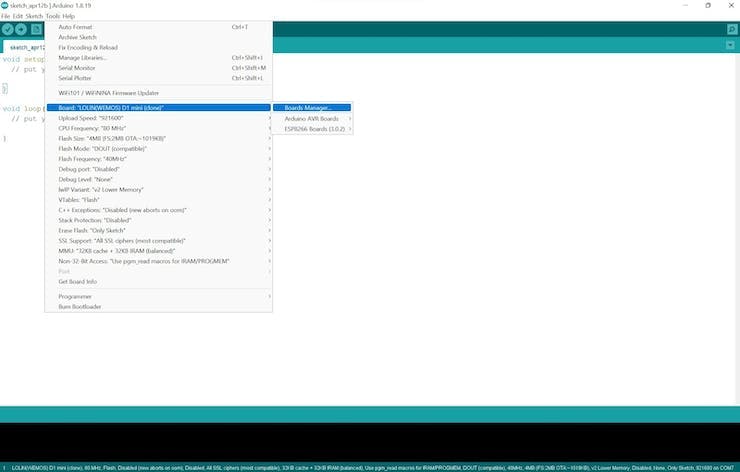
3. 接下来,转到工具并选择板:然后选择板管理器。

4. 打开Boards Manager并在搜索栏中输入 ESP8266。 5 . 安装 esp8266。
5.安装esp8266。

下载所有必需的库后,让我们创建一个 Blynk 项目来管理我们的 IoT 宠物喂食器。
1. 创建一个 Blynk 帐户并在网络浏览器中打开 Blynk。
2. 转到模板并单击网页右上角的+ 新模板按钮。
3. 为您的设备命名并选择您将使用的硬件。在这个项目中,我们将使用 ESP8266,连接类型应该是Wi-Fi 。
4. 单击完成按钮创建一个新模板。

现在我们已经创建了一个 Blynk 项目,让我们来谈谈如何创建按钮来使用虚拟引脚来控制我们的伺服电机。
Blynk Virtual Pins 旨在在硬件和 Blynk 云应用程序之间交换数据。虚拟引脚允许您从应用程序向微控制器发送命令或从微控制器接收数据。使用虚拟引脚,您可以控制各种设备,例如传感器和伺服电机。
1. 在模板部分打开您的硬件设备。
2. 转到数据流并点击右上角的编辑按钮开始对您的项目进行更改。
3. 数据流是用于在硬件设备和 Blynk 应用程序之间交换数据的通道。要在硬件和 Blynk 应用程序之间创建数据传输通道,请单击“添加数据流”按钮并创建一个新的虚拟 Pin。
4. 将 PIN 设置为V1并选择Integer作为 DATA TYPE。
5. 设置按钮的最小值和最大值。
6. 完成所有更改后,点击保存,然后点击网页右上角的保存并应用按钮。

1. 在编辑模式下,转到事件并点击+ 添加新事件。

2. 为您的事件命名,然后打开选项将事件发送到通知选项卡。

3. 转到通知并启用通知。
4. Blynk 提供三种传递通知的方式:电子邮件、推送通知和短信。在您想要的选项下添加设备所有者。
5. Blynk 允许您限制通知的数量。在“通知限制”部分,您可以限制在指定时间段内可以发送的通知数量。例如,当Limit Period设置为1小时,Event Counter设置为1时,即使该时间段内多次触发事件,用户也只会在一小时内收到一次通知。

6. 完成所有更改后,点击保存并应用。
在 Web 浏览器上配置 Blynk 项目后,就可以在移动设备上设置项目,以便远程控制硬件。
1. 从苹果或安卓商店下载 Blynk Mobile App。
2. 在 Blynk 应用程序中,打开您的 IoT 项目并选择设置(右上角的扳手)。

3. 单击+按钮打开 Widget Box。

4. 将最简单的按钮添加到您的项目中。这种类型的按钮可以在两种模式下运行:按下和切换。在 Push 模式下工作时,按下按钮将切换到 ON 状态,松开按钮将返回 OFF 状态。开关模式允许您按下按钮一次,然后它将保持打开或关闭状态,直到您再次按下按钮以更改其状态。

您可以按照本教程进行操作并编写代码,或者只需在此处下载项目代码。
在您的主固件的最顶部,在添加任何指令之前定义模板 ID和设备名称。模板 ID 和设备名称可以在Blynk 设备的信息页面上找到。#include

在这个项目中,我们正在使用 Blynk 库,因此我们需要在固件顶部包含指令 #include 。
然后,我们需要在固件中配置网络连接。我们需要定义三个参数。第一个是您的Blynk 身份验证令牌,它可以在您的 Blynk 项目仪表板上找到。第二个是您的Wi-Fi SSID ,最后一个是您的Wi-Fi 密码。定义三个参数后,将它们包含在函数中Blynk.begin(auth, ssid, pass)。
最后,要完成 Blynk 库设置,您需要为BLYNK_TEMPLATE_ID和BLYNK_DEVICE_NAME参数包含一个#define,这些参数也应该在您的 Blynk 项目仪表板上找到。
#define BLYNK_TEMPLATE_ID "Replace with your template ID"
#define BLYNK_DEVICE_NAME "Quickstart Template"
#include
// ESP8266
char auth[] = "Your Blynk Auth Token"; // Blynk token
char ssid[] = "Replace with your WiFi SSID"; // Your WiFI SSID
char pass[] = "Replace with your WiFi password"; // Your Wifi password
void setup()
{
    Serial.begin(9600);
    Serial.println("Start!");
    Serial.print("Connecting...");
    Blynk.begin(auth, ssid, pass);
}
void loop()
{
}
接下来,让我们谈谈如何通过 Blynk 控制您的设备。
在上一步中,我们配置了一个虚拟 Pin 来打开和关闭事物。由于所有虚拟引脚值始终以字符串形式发送,因此我们需要将传入数据解释为整数、浮点数、双精度数或字符串。例如,下面的命令意味着传入的虚拟 Pin 数据将被解释为整数:
int pinValue = param.asInt();
要从您的设备向 Blynk 应用程序发送数据,请使用Blynk.virtualWrite(pin, value).
要接收从应用程序发送的数据,请使用函数BLYNK_WRITE(vPin)。在我们的固件中,BLYNK_WRITE(V1)意味着设备正在等待将某些内容写入 V1。换句话说,设备正在等待我们切换与 V1 关联的按钮的状态。
您可以访问官方Blynk 文档以了解有关虚拟引脚的更多信息。
#define BLYNK_TEMPLATE_ID "Replace with your template ID"
#define BLYNK_DEVICE_NAME "Quickstart Template"
#include
// ESP8266
char auth[] = "Your Blynk Auth Token"; // Blynk token
char ssid[] = "Replace with your WiFi SSID"; // Your WiFI SSID
char pass[] = "Replace with your WiFi password"; // Your Wifi password
// Create a button to control the servo motor
// This is a standalone function and can't be used inside of any loop or function.
// Go to Blynk documentation for more details:
//
BLYNK_WRITE(V1)
{
    // Assign incoming value from pin V1 to the variable pinValue
    int pinValue = param.asInt();
    //Serial.print("V1 button value is: ");
    //Serial.println(pinValue);
}
void setup()
{
    Serial.begin(9600);
    Serial.println("Start!");
    Serial.print("Connecting...");
    Blynk.begin(auth, ssid, pass);
}
void loop()
{
}
现在我们已经创建了通过互联网控制设备的按钮,让我们讨论一下我们需要在固件中写入什么来向您的手机或电子邮件发送通知。Blynk 使用 Events 来跟踪您设备上发生的事件,并将通知发送到 Blynk 应用程序或您的电子邮件。
要发送通知,请使用Blynk.logEvent(“event_code”, “message”); 功能。可以在活动页面上找到。event_code
例如,该命令Blynk.logEvent("motion_detected", "Motion Detected!");表示设备将发送通知“检测到运动!” 如果 PIR 运动传感器检测到运动。
#define BLYNK_TEMPLATE_ID "Replace with your template ID"
#define BLYNK_DEVICE_NAME "Quickstart Template"
#include 8266.h>
// ESP8266
char auth[] = "Your Blynk Auth Token"; // Blynk token
char ssid[] = "Replace with your WiFi SSID"; // Your WiFI SSID
char pass[] = "Replace with your WiFi password"; // Your Wifi password
// Create a button to control the servo motor
// This is a standalone function and can't be used inside of any loop or function.
// Go to Blynk documentation for more details.
BLYNK_WRITE(V1)
{
    // Assign incoming value from pin V1 to the variable pinValue
    int pinValue = param.asInt();
    if (pinValue == 1)
    {
        // Send a notification to the user
        Blynk.logEvent("food_dispensed", "Food Dispensed!");
    }
    //Serial.print("V1 button value is: ");
    //Serial.println(pinValue);
}
void setup()
{
    Serial.begin(9600);
    Serial.println("Start!");
    Serial.print("Connecting...");
    Blynk.begin(auth, ssid, pass);
}
void loop()
{
}
接下来,让我们进入项目中移动的部分;伺服电机!我们将使用 Arduino Servo 库,因此让我们通过#include 在代码顶部添加一个并实例化 Servo 对象并将其连接到 WeMos D1 Mini 上的引脚 4 来设置该库。
#include
// Servo Motor
Servo ServoMotor;
int ServoPin = D4;
现在,我们要告诉我们的伺服电机通过移动到特定位置然后在一段时间后移回关闭位置来打开狗食容器。我们可以通过添加两个新变量来定义伺服电机的起始位置和最终位置来开始。
const int ServoInitialPosition = 0; // Starting position of servo motor
const int ServoFinalPosition = 135; // Final position of servo motor
然后我们可以在BLYNK_WRITE(V1)函数中添加代码来控制伺服电机。你现在应该有这样的东西了。
#define BLYNK_TEMPLATE_ID "Replace with your template ID"
#define BLYNK_DEVICE_NAME "Quickstart Template"
#include 8266.h>
#include
// Servo Motor
Servo ServoMotor;
int ServoPin = D4;
const int ServoInitialPosition = 0; // Starting position of servo motor
const int ServoFinalPosition = 135; // Final position of servo motor
// ESP8266
char auth[] = "Your Blynk Auth Token"; // Blynk token
char ssid[] = "Replace with your WiFi SSID"; // Your WiFI SSID
char pass[] = "Replace with your WiFi password"; // Your Wifi password
// Create a button to control the servo motor
// This is a standalone function and can't be used inside of any loop or function.
// Go to Blynk documentation for more details:
//
BLYNK_WRITE(V1)
{
    // Assign incoming value from pin V1 to the variable pinValue
    int pinValue = param.asInt();
    if (pinValue == 1)
    {
        ServoMotor.attach(ServoPin); // Enable control signal of the servo motor
        // Rotate the shaft to the final position
        ServoMotor.write(ServoFinalPosition);
        delay(1000);

        // Rotate the shaft to the initial position
        ServoMotor.write(ServoInitialPosition);
        delay(1000);
        ServoMotor.detach(); // Disable control signal

        // Send a notification to the user
        Blynk.logEvent("food_dispensed", "Food Dispensed!");
    }
    //Serial.print("V1 button value is: ");
    //Serial.println(pinValue);
}
void setup()
{
    Serial.begin(9600);
    Serial.println("Start!");
    Serial.print("Connecting...");
    Blynk.begin(auth, ssid, pass);
}
void loop()
{
}
接下来是为 PIR 传感器编写代码,以便我们知道狗何时接近自动喂狗器。在我们的例子中,我们的 PIR 传感器功能可以相当简单,因为我们只需要知道狗是否在那里(二进制输出)。如果我们感觉到狗在那里,我们想将该消息发送回 Blynk 应用程序,我们想打开电路中的 LED。
首先让我们定义连接到 PIR 传感器的引脚和void setup(). 我还想添加另一个变量PIR_status来跟踪 PIR 传感器的状态。
// Define pins for the PIR Motion Sensor
int PIR_pin = D7;
int PIR_status = 0;
// LED for PIR motion sensor
int ledPin = D2;
要检查 PIR 传感器是否检测到任何东西,我们可以使用该digitalRead() 功能,如果PIR_status是HIGH(意味着已检测到狗),我们可以将该信息发送回 Blynk 应用程序。
void PIR_sensor()
{
    PIR_status = digitalRead(PIR_pin);
    //Serial.println(PIR_status);
    if (PIR_status == HIGH)
    {
        Serial.println("Motion Detected!");
        Blynk.logEvent("motion_detected", "Motion Detected!");
        // If motion is detected, turn on LED
        digitalWrite(ledPin, HIGH);
    }
    else
    {
        Serial.println("Motion Stopped!");
    }
}
总之,我们的代码现在应该看起来像这样。
#define BLYNK_TEMPLATE_ID "Replace with your template ID"
#define BLYNK_DEVICE_NAME "Quickstart Template"
#include 8266.h>
#include
// Servo Motor
Servo ServoMotor;
int ServoPin = D4;
const int ServoInitialPosition = 0; // Starting position of servo motor
const int ServoFinalPosition = 135; // Final position of servo motor
// Define pins for the PIR Motion Sensor
int PIR_pin = D7;
int PIR_status = 0;
// LED for PIR motion sensor
int ledPin = D2;
// ESP8266
char auth[] = "Your Blynk Auth Token"; // Blynk token
char ssid[] = "Replace with your WiFi SSID"; // Your WiFI SSID
char pass[] = "Replace with your WiFi password"; // Your Wifi password
// Create a button to control the servo motor
// This is a standalone function and can't be used inside of any loop or function.
// Go to Blynk documentation for more details:
//
BLYNK_WRITE(V1)
{
    // Assign incoming value from pin V1 to the variable pinValue
    int pinValue = param.asInt();
    if (pinValue == 1)
    {
        ServoMotor.attach(ServoPin); // Enable control signal of the servo motor
        // Rotate the shaft to the final position
        ServoMotor.write(ServoFinalPosition);
        delay(1000);

        // Rotate the shaft to the initial position
        ServoMotor.write(ServoInitialPosition);
        delay(1000);
        ServoMotor.detach(); // Disable control signal

        // Send a notification to the user
        Blynk.logEvent("food_dispensed", "Food Dispensed!");
    }
    //Serial.print("V1 button value is: ");
    //Serial.println(pinValue);
}
void PIR_sensor()
{
    PIR_status = digitalRead(PIR_pin);
    //Serial.println(PIR_status);
    if (PIR_status == HIGH)
    {
        Serial.println("Motion Detected!");
        Blynk.logEvent("motion_detected", "Motion Detected!");
        // If motion is detected, turn on LED
        digitalWrite(ledPin, HIGH);
    }
    else
    {
        Serial.println("Motion Stopped!");
    }
}
void setup()
{
    Serial.begin(9600);
    Serial.println("Start!");
    Serial.print("Connecting...");
    Blynk.begin(auth, ssid, pass);
}
void loop()
{
}
截至目前,我们的代码在技术上应该可以工作;然而,我们现在所拥有的可能容易出现不稳定的行为,因为我们没有考虑 PIR 传感器可能遇到的任何噪声,这可能导致错误触发或快速切换。
除了我们的噪音问题,Blynk 每天只允许发送 100 条通知。因此,我们需要好好利用这些通知。这可以使用SimpleTimer库来完成。
在我们的代码中,我们需要将 PIR 运动传感器设置为每 3 秒检测一次运动,如果检测到运动,LED 将保持亮起 30 秒。如果连续检测到移动,只会向 Blynk 应用程序发送一个通知,这也有助于解决不稳定的行为。
要下载 SimpleTimer 库,只需按照下载和安装库的步骤操作即可。成功添加库后,我们就可以#include 毫无问题地在代码顶部添加指令。
#include
接下来,让我们使用这个库实例化一个 SimpleTimer 对象,并在void setup().
SimpleTimer timer;
int counter = 0;
// Set a flag to make sure the program only sends one notification if motion is
// detected continuously
int flag = 1;
现在我们需要void setup()通过包含代码来设置计时器的间隔:
timer.setInterval(3000L,PIR_sensor); // Detects motion every 3 seconds
接下来,我们可以更新PIR_snesor()函数内的代码,使一切顺利运行。
void PIR_sensor()
{
    counter++;
    Serial.println(counter);
    // Turn off LED if no motion has been detected for 30 seconds
    if (counter == 10)
    {
        digitalWrite(ledPin, LOW);
        counter = 0;
        flag = 1;
    }
    PIR_status = digitalRead(PIR_pin);
    //Serial.println(PIR_status);
    if (PIR_status == HIGH)
    {
        if (flag == 1)
        {
            Serial.println("Motion Detected!");
            Blynk.logEvent("motion_detected", "Motion Detected!");
            // If motion is detected, turn on LED
            digitalWrite(ledPin, HIGH);
            counter = 0;
            flag = 0;
        }
    }
    else
    {
        Serial.println("Motion Stopped!");
    }
}
最后,我们现在应该将 Blynk 和计时器对象设置为在void loop().
void loop()
{
    Blynk.run();
    timer.run();
}
最后,您现在应该拥有如下所示的最终代码。
#define BLYNK_TEMPLATE_ID "Replace with your template ID"
#define BLYNK_DEVICE_NAME "Quickstart Template"
#include 8266.h>
#include
// Servo Motor
Servo ServoMotor;
int ServoPin = D4;
const int ServoInitialPosition = 0; // Starting position of servo motor
const int ServoFinalPosition = 135; // Final position of servo motor
// Define pins for the PIR Motion Sensor
int PIR_pin = D7;
int PIR_status = 0;
// LED for PIR motion sensor
int ledPin = D2;
// ESP8266
char auth[] = "Your Blynk Auth Token"; // Blynk token
char ssid[] = "Replace with your WiFi SSID"; // Your WiFI SSID
char pass[] = "Replace with your WiFi password"; // Your Wifi password
// Create a button to control the servo motor
// This is a standalone function and can't be used inside of any loop or function.
// Go to Blynk documentation for more details:
//
BLYNK_WRITE(V1)
{
    // Assign incoming value from pin V1 to the variable pinValue
    int pinValue = param.asInt();
    if (pinValue == 1)
    {
        ServoMotor.attach(ServoPin); // Enable control signal of the servo motor
        // Rotate the shaft to the final position
        ServoMotor.write(ServoFinalPosition);
        delay(1000);

        // Rotate the shaft to the initial position
        ServoMotor.write(ServoInitialPosition);
        delay(1000);
        ServoMotor.detach(); // Disable control signal

        // Send a notification to the user
        Blynk.logEvent("food_dispensed", "Food Dispensed!");
    }
    //Serial.print("V1 button value is: ");
    //Serial.println(pinValue);
}
void PIR_sensor()
{
    counter++;
    Serial.println(counter);
    // Turn off LED if no motion has been detected for 30 seconds
    if (counter == 10)
    {
        digitalWrite(ledPin, LOW);
        counter = 0;
        flag = 1;
    }
    PIR_status = digitalRead(PIR_pin);
    //Serial.println(PIR_status);
    if (PIR_status == HIGH)
    {
        if (flag == 1)
        {
            Serial.println("Motion Detected!");
            Blynk.logEvent("motion_detected", "Motion Detected!");
            // If motion is detected, turn on LED
            digitalWrite(ledPin, HIGH);
            counter = 0;
            flag = 0;
        }
    }
    else
    {
        Serial.println("Motion Stopped!");
    }
}
void setup()
{
    Serial.begin(9600);
    Serial.println("Start!");
    Serial.print("Connecting...");
    Blynk.begin(auth, ssid, pass);
}
void loop()
{
    Blynk.run();
    timer.run();
}
有许多方法可以构建食品容器。最简单的方法之一是使用塑料容器和硬纸板。本教程使用塑料管作为食品容器,因为我们想专注于项目的电子部分,但您可以在此处找到有关如何制作漂亮容器的教程。
先在塑料食品容器的底部剪一个小孔,用一小块硬纸板盖住塑料食品容器上的孔。然后,将纸板盖粘到伺服电机的轴上。伺服电机和塑料食品容器都应该用胶带粘在墙上以保持固定。
现在我们已经完成了容器的构建,我们需要确保伺服电机可以旋转盖子来分配食物。
在您的固件中,更改伺服电机的初始位置和您希望电机旋转的角度。食物分配后,伺服电机应返回初始位置。
该变量ServoInitialPosition存储伺服电机的初始位置。当伺服电机在此位置时,盖子应盖住纸箱的孔,以防止食物从容器中漏出。另一个变量ServoFinalPosition存储您希望电机旋转以分配食物的角度。
const int ServoInitialPosition = 0; //starting position
const int ServoFinalPosition = 135; //final position

现在我们自制的物联网宠物喂食器可以进行测试了。通过 USB 数据线连接 WeMos D1 迷你板的微型 USB 端口,为宠物喂食器供电。根据您的宠物喂食器的设计和您用来构建宠物喂食器的组件,您可能需要对代码进行小幅修改。
总的来说,我们已经熟悉了使用 Arduino IDE 的 WeMos D1 Mini 和 Blynk IoT 平台,并最终得到了一个很棒的 IoT Dog Feeder 来展示它!
如果您喜欢这个项目,请与其他人分享,以便我们继续制作这些类型的项目!如果您对我们提供的更多内容感兴趣,可以访问我们的学习中心以获取更出色且易于访问的电子教育。
声明:本文内容及配图由入驻作者撰写或者入驻合作网站授权转载。文章观点仅代表作者本人,不代表电子发烧友网立场。文章及其配图仅供工程师学习之用,如有内容侵权或者其他违规问题,请联系本站处理。 举报投诉
全部0条评论

快来发表一下你的评论吧 !