×

在KV260上运行Yolov4 tiny

消耗积分:2 | 格式:zip | 大小:0.00 MB | 2023-06-14

h1654155275.3239

分享资料个

描述

Xilinx 提供了 Vitis™ Video Analytics SDK,我们可以使用它来运行我们自己的对象检测。我们将展示如何使用 yolov4-tiny 训练您的自定义数据集并在 KV260 上运行它。

确保您已准备好以下工作:

1.在yolov4-tiny上训练一个自定义数据集

一个。git clone https://github.com/XiongDa0001/yolov4-tiny-keras

湾。制作 VOC 格式的数据集

C。运行 voc_annotation.py 得到 2007_train.txt 和 2007_val.txt 进行训练

d。修改 classes_path 中的内容以包含您检测到的内容

e. 安装 tensorflow-gpu==1.13.1 和 Cuda 10.0 或 10.1

更多训练过程请参考https://github.com/bubbliiiing/yolov4-tiny-keras

2.将h5转换为pb

我们的代码提供了一个转换脚本keras2pb.py

您应该按如下方式修改变量:

一个。指定input_model

指定output_model

C。指定num_class

然后你会得到 freeze pb 文件。

3.模型量化

该项目使用Vitis-AI 1.4 首先进入docker环境,然后

conda 激活 vitis-ai-tensorflow。

在量化之前,可以使用如下命令查看mode的输入输出节点

vai_q_tensorflow inspect --input_frozen_graph=~.pb
pYYBAGNYp2GADtaxAAB8vQeo-b8881.png
 

量化需要准备如下:

pYYBAGNYp2OAdO1kAABgExlnNho271.png
 

input_fn.py如下

from PIL import Image
import numpy as np


def letterbox_image(image, size):
    '''resize image with unchanged aspect ratio using padding'''
    iw, ih = image.size
    w, h = size
    scale = min(w/iw, h/ih)
    nw = int(iw*scale)
    nh = int(ih*scale)

    image = image.resize((nw,nh), Image.BICUBIC)
    new_image = Image.new('RGB', size, (128,128,128))
    new_image.paste(image, ((w-nw)//2, (h-nh)//2))
    return new_image

#image = Image.open(img_path)

def preprocessing_fn(image, model_image_size=(416,416)):
    if model_image_size != (None, None):
        assert model_image_size[0]%32 == 0, 'Multiples of 32 required'
        assert model_image_size[1]%32 == 0, 'Multiples of 32 required'
        boxed_image = letterbox_image(image, tuple(reversed(model_image_size)))
    else:
        new_image_size = (image.width - (image.width % 32), image.height - (image.height % 32))
        boxed_image = letterbox_image(image, new_image_size)
    image_data = np.array(boxed_image, dtype='float32')
    image_data /= 255.
    return image_data

calib_image_dir = "calibrate_images"
calib_image_list = "calibrate.txt"
calib_batch_size = 8
def calib_input(iter):
  images = []
  line = open(calib_image_list).readlines()
  for index in range(0, calib_batch_size):
    curline = line[iter * calib_batch_size + index]
    image_name = curline.strip()
    image = Image.open(image_name)
    image = preprocessing_fn(image)
    images.append(image)
  return {"input_1": images}

我们提供get_name.py来获取每个图像的名称。

#!/usr/bin/python
#coding:utf-8
import os
num=0
path_imgs = './calibrate_images'
for files in os.listdir(path_imgs):
    print(files)
    img_path = path_imgs + '/' + files
    num  = num + 1
    with open("./calibrate_images/calibrate.txt", "a") as f:
        f.write(str(img_path) + '\n')

创建一个“量化”文件夹来保存量化文件

* 下一步是量化模型。

vai_q_tensorflow quantize \
     --input_frozen_graph ./yolov4-tiny-voc.pb \
     --input_nodes input_1 \
     --input_shapes ?,416,416,3 \
     --output_dir ./quantize \
     --output_nodes conv2d_21/BiasAdd,conv2d_24/BiasAdd \
     --input_fn input_fn.calib_input \
     --calib_iter 25

calibrate_images 数量 = calib_iter * calib_batch_size

然后你会在quantized文件夹下得到quantize_eval_model.pb

4. 编译模型

VAI_C 的常用选项如下所示。

--arch:JSON 格式的 VAI_C 编译器的 DPU 架构配置文件。它包含编译期间云和边缘 DPU 的专用选项。

您需要创建 arch.json 文件,如下所示:

{
    "target": "DPUCZDX8G_ISA0_B3136_MAX_BG2"
}
  • --frozen_pb:量化文件(quantize_eval_model.pb
  • --output-dir:存放编译输出的文件夹
  • --net_name:VAI_C编译后网络模型的DPU内核名称

有时,T ensorFlow 模型不包含输入张量形状信息,导致编译失败。您可以使用

--options '{"input_shape":"1, 224, 224, 3"}'指定输入张量形状。

创建一个“编译”文件夹来保存量化文件

使用以下命令获取xmodel文件

vai_c_tensorflow \
    --f ./quantize14/quantize_eval_model.pb \
    --a   kv260arch_B3136.json \
    --output_dir compile \
    --n   mask_detection \
    --options '{"input_shape": "1,224,224,3"}'

5. 数据准备

我们需要准备以下文件,这些文件位于我的 github https://github.com/XiongDa0001/yolov4-tiny-keras

├─face_mask
	|_____aiinference.json
	|_____drawresult.json
	|_____preprocess.json
└─mask-detection-yolo4-tiny
	|_____mask-detection-yolo4-tiny.prototxt
	|_____mask-detection-yolo4-tiny.xmodel
	|_____label.json

将“face_mask”文件夹放在 /opt/xilinx/share/ivas/smartcam 文件夹中

同时,将“mask-detection-yolo4-tiny”放入/opt/xilinx/share/ivas/vitis_​​ai_library/models/kv260-smartcam文件夹中

6.运行模型

sudo xmutil      unloadapp
sudo xmutil      loadapp kv260-smartcam
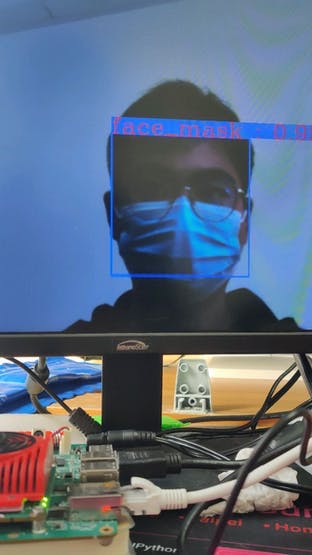
sudo smartcam --mipi -W 1920 -H 1080 --target dp -a face_mask

这是一个运行示例的演示
poYBAGNYp2WAKVdgAABX09BreCA554.png


声明:本文内容及配图由入驻作者撰写或者入驻合作网站授权转载。文章观点仅代表作者本人,不代表电子发烧友网立场。文章及其配图仅供工程师学习之用,如有内容侵权或者其他违规问题,请联系本站处理。 举报投诉

评论(0)
发评论

下载排行榜

全部0条评论

快来发表一下你的评论吧 !

'+ '

'+ '

'+ ''+ '
'+ ''+ ''+ '
'+ ''+ '' ); $.get('/article/vipdownload/aid/'+webid,function(data){ if(data.code ==5){ $(pop_this).attr('href',"/login/index.html"); return false } if(data.code == 2){ //跳转到VIP升级页面 window.location.href="//m.lene-v.com/vip/index?aid=" + webid return false } //是会员 if (data.code > 0) { $('body').append(htmlSetNormalDownload); var getWidth=$("#poplayer").width(); $("#poplayer").css("margin-left","-"+getWidth/2+"px"); $('#tips').html(data.msg) $('.download_confirm').click(function(){ $('#dialog').remove(); }) } else { var down_url = $('#vipdownload').attr('data-url'); isBindAnalysisForm(pop_this, down_url, 1) } }); }); //是否开通VIP $.get('/article/vipdownload/aid/'+webid,function(data){ if(data.code == 2 || data.code ==5){ //跳转到VIP升级页面 $('#vipdownload>span').text("开通VIP 免费下载") return false }else{ // 待续费 if(data.code == 3) { vipExpiredInfo.ifVipExpired = true vipExpiredInfo.vipExpiredDate = data.data.endoftime } $('#vipdownload .icon-vip-tips').remove() $('#vipdownload>span').text("VIP免积分下载") } }); }).on("click",".download_cancel",function(){ $('#dialog').remove(); }) var setWeixinShare={};//定义默认的微信分享信息,页面如果要自定义分享,直接更改此变量即可 if(window.navigator.userAgent.toLowerCase().match(/MicroMessenger/i) == 'micromessenger'){ var d={ title:'在KV260上运行Yolov4 tiny',//标题 desc:$('[name=description]').attr("content"), //描述 imgUrl:'https://'+location.host+'/static/images/ele-logo.png',// 分享图标,默认是logo link:'',//链接 type:'',// 分享类型,music、video或link,不填默认为link dataUrl:'',//如果type是music或video,则要提供数据链接,默认为空 success:'', // 用户确认分享后执行的回调函数 cancel:''// 用户取消分享后执行的回调函数 } setWeixinShare=$.extend(d,setWeixinShare); $.ajax({ url:"//www.lene-v.com/app/wechat/index.php?s=Home/ShareConfig/index", data:"share_url="+encodeURIComponent(location.href)+"&format=jsonp&domain=m", type:'get', dataType:'jsonp', success:function(res){ if(res.status!="successed"){ return false; } $.getScript('https://res.wx.qq.com/open/js/jweixin-1.0.0.js',function(result,status){ if(status!="success"){ return false; } var getWxCfg=res.data; wx.config({ //debug: true, // 开启调试模式,调用的所有api的返回值会在客户端alert出来,若要查看传入的参数,可以在pc端打开,参数信息会通过log打出,仅在pc端时才会打印。 appId:getWxCfg.appId, // 必填,公众号的唯一标识 timestamp:getWxCfg.timestamp, // 必填,生成签名的时间戳 nonceStr:getWxCfg.nonceStr, // 必填,生成签名的随机串 signature:getWxCfg.signature,// 必填,签名,见附录1 jsApiList:['onMenuShareTimeline','onMenuShareAppMessage','onMenuShareQQ','onMenuShareWeibo','onMenuShareQZone'] // 必填,需要使用的JS接口列表,所有JS接口列表见附录2 }); wx.ready(function(){ //获取“分享到朋友圈”按钮点击状态及自定义分享内容接口 wx.onMenuShareTimeline({ title: setWeixinShare.title, // 分享标题 link: setWeixinShare.link, // 分享链接 imgUrl: setWeixinShare.imgUrl, // 分享图标 success: function () { setWeixinShare.success; // 用户确认分享后执行的回调函数 }, cancel: function () { setWeixinShare.cancel; // 用户取消分享后执行的回调函数 } }); //获取“分享给朋友”按钮点击状态及自定义分享内容接口 wx.onMenuShareAppMessage({ title: setWeixinShare.title, // 分享标题 desc: setWeixinShare.desc, // 分享描述 link: setWeixinShare.link, // 分享链接 imgUrl: setWeixinShare.imgUrl, // 分享图标 type: setWeixinShare.type, // 分享类型,music、video或link,不填默认为link dataUrl: setWeixinShare.dataUrl, // 如果type是music或video,则要提供数据链接,默认为空 success: function () { setWeixinShare.success; // 用户确认分享后执行的回调函数 }, cancel: function () { setWeixinShare.cancel; // 用户取消分享后执行的回调函数 } }); //获取“分享到QQ”按钮点击状态及自定义分享内容接口 wx.onMenuShareQQ({ title: setWeixinShare.title, // 分享标题 desc: setWeixinShare.desc, // 分享描述 link: setWeixinShare.link, // 分享链接 imgUrl: setWeixinShare.imgUrl, // 分享图标 success: function () { setWeixinShare.success; // 用户确认分享后执行的回调函数 }, cancel: function () { setWeixinShare.cancel; // 用户取消分享后执行的回调函数 } }); //获取“分享到腾讯微博”按钮点击状态及自定义分享内容接口 wx.onMenuShareWeibo({ title: setWeixinShare.title, // 分享标题 desc: setWeixinShare.desc, // 分享描述 link: setWeixinShare.link, // 分享链接 imgUrl: setWeixinShare.imgUrl, // 分享图标 success: function () { setWeixinShare.success; // 用户确认分享后执行的回调函数 }, cancel: function () { setWeixinShare.cancel; // 用户取消分享后执行的回调函数 } }); //获取“分享到QQ空间”按钮点击状态及自定义分享内容接口 wx.onMenuShareQZone({ title: setWeixinShare.title, // 分享标题 desc: setWeixinShare.desc, // 分享描述 link: setWeixinShare.link, // 分享链接 imgUrl: setWeixinShare.imgUrl, // 分享图标 success: function () { setWeixinShare.success; // 用户确认分享后执行的回调函数 }, cancel: function () { setWeixinShare.cancel; // 用户取消分享后执行的回调函数 } }); }); }); } }); } function openX_ad(posterid, htmlid, width, height) { if ($(htmlid).length > 0) { var randomnumber = Math.random(); var now_url = encodeURIComponent(window.location.href); var ga = document.createElement('iframe'); ga.src = 'https://www1.elecfans.com/www/delivery/myafr.php?target=_blank&cb=' + randomnumber + '&zoneid=' + posterid+'&prefer='+now_url; ga.width = width; ga.height = height; ga.frameBorder = 0; ga.scrolling = 'no'; var s = $(htmlid).append(ga); } } openX_ad(828, '#berry-300', 300, 250);