
本指南提供了在 Ultra96-V2 平台上用 Python 实现人脸检测和人脸跟踪的详细说明。
本教程建立在以下“Avnet Vitis 平台的 Vitis-AI 1.1 流程”两部分教程的基础之上:
https://www.hackster.io/AlbertaBeef/vitis-ai-1-1-flow-for-avnet-vitis-platforms-part-1-007b0e
https://www.hackster.io/AlbertaBeef/vitis-ai-1-1-flow-for-avnet-vitis-platforms-part-2-f18be4
虽然本教程专门针对 Ultra96-V2 平台,但它可以针对以下任何平台:
在本教程中,我们将构建以下 AI 管道,用 Python 实现,它可以作为未来算法探索的基础。

有许多算法可用于人脸检测:
还有几种算法可用于对象跟踪:
将“检测”算法与“跟踪”算法结合起来的一种可能策略是利用“跟踪”算法通常比“检测”算法更快的事实。一种可能的实现可以从一次“检测”迭代开始,然后是几次“跟踪”迭代,以优化有限的计算资源。
在本教程中,我将采用不同的策略。由于我们已经有一个实时运行的优化人脸检测算法(DenseBox),我将在每一帧上执行人脸“检测”,并使用一个更简单的跟踪算法,也在每一帧上执行。
我决定使用的对象跟踪是一个简单的质心跟踪器,由 PyImageSearch 的 Adrian Rosebrock 实现:
Adrian Rosebrock,使用 OpenCV 进行简单对象跟踪,PyImageSearch,https: //www.pyimagesearch.com/2018/07/23/simple-object-tracking-with-opencv/ 于 2020 年 6 月 15 日访问
如前所述,本教程将重用现有的预优化densebox模型进行人脸检测。我们已经在“Vitis-AI 1.1. Avnet Vitis 平台的流程”教程。这一次,我们将从 Python 脚本而不是 C++ 应用程序调用它。使用 Python 的动机很简单,因为 Python 语言在业界主要用于快速算法探索。有大量的 Python 包和示例可用于快速构建创意原型。
本教程将执行以下步骤:
人脸检测的Python实现
赛灵思提供的 Vitis-AI 1.1 为赛灵思器件上的 AI 推理提供了开发流程。该流程包括一个称为 DPU(深度学习处理单元)的 AI 引擎,以及一个用于 Linux 应用程序的 API,称为 VART。
此 VART API 可用于 C++ 应用程序以及 Python 脚本。
提供的大多数示例都是用 C++ 编写的,而其中两个分类示例是用 Python 提供的:
但是,没有为以下人脸检测模型提供 Python 示例:
由于理解 API 的最佳方式是编写利用它的代码,因此我着手编写 Python 版本的人脸检测示例,利用 Model Zoo 中的 densebox 模型。
事实证明,我在模型动物园中找到了一个验证脚本,用于 cf_densebox_wider_360_640_1.11G 模型,
models/cf_densebox_wider_360_640_1.11G/code/test/visualTest/detect.py
这个脚本被用作我的代码实现的参考。
首先,使用 VART API 的 Python 示例的一般格式如下:
dpu = runner.Runner("vitis_rundir")[0]
""" Prepare input/output buffers """
...
""" Execute model on DPU """
job_id = dpu.execute_async( inputData, outputData )
dpu.wait(job_id)
""" Retrieve output results """
...
第一行初始化 VART API,并指定可以找到模型元数据的目录。在我们的Vitis-AI 1.1平台中,我们感兴趣的是640x360版本的densebox模型,它位于“/usr/share/vitis-ai_library/models/densebox_640_360”目录下,内容如下:
/usr/share/vitis_ai_library/models/densebox_640_360/
│
│ densebox_640_360.elf
│ densebox_640_360.prototxt
│ meta.json
“meta.json”文件包含模型的元数据:
{
   "target": "DPUv2",
   "lib": "libvart-dpu-runner.so",
   "filename": "densebox_640_360.elf",
   "kernel": [ "densebox_640_360" ],
   "config_file": "densebox_640_360.prototxt"
}
该文件表明我们使用“libvart-dpu-runner.so”API 以“DPUv2”硬件内核为目标。该模型有一个内核,它是构成 CNN 模型的连续层序列。内核名称为“densebox_640_360”,该内核的可执行代码/数据包含在“densebox_640_360.elf”二进制文件中。
prototxt 文件指示了我们 Python 实现所需的重要预处理信息(平均值、比例因子)。
model {
   name : "dense_box_640x360"
   kernel {
      name: "tiling_v7_640"
      mean: 128.0
      mean: 128.0
      mean: 128.0
      scale: 1.0
      scale: 1.0
      scale: 1.0
   }
   model_type : DENSE_BOX
   dense_box_param {
      num_of_classes : 2
      nms_threshold: 0.3
      det_threshold: 0.9
   }
}
第一步是对输入图像进行预处理,并准备输入/输出缓冲区:
""" Image pre-processing """
# normalize
img = img - 128.0
# resize
img = cv2.resize(img,(inputWidth,inputHeight))

""" Prepare input/output buffers """
inputData = []
inputData.append(np.empty((inputShape), dtype=np.float32,order='C'))
inputImage = inputData[0]
inputImage[0,...] = img

outputData = []
outputData.append(np.empty((output0Shape), dtype=np.float32,order='C'))
outputData.append(np.empty((output1Shape), dtype=np.float32,order='C'))
预处理包括减去均值 (128)、缩放(在本例中为 1.0,因此不执行),以及将输入图像的大小调整为模型的输入尺寸 inputWidth x inputHeight (640 x 360)。
接下来,需要准备一个包含输入图像的输入缓冲区,并且需要为以下两个输出分配两个输出缓冲区:
请注意,模型输出由 2D 网格结果组成,比输入图像小 4 倍(宽度和高度)。
模型在 DPU 上执行,然后从内存中检索两个输出结果。
""" Execute model on DPU """
job_id = dpu.execute_async( inputData, outputData )
dpu.wait(job_id)

""" Retrieve output results """
OutputData0 = outputData[0].reshape(1,output0Size)
bboxes = np.reshape( OutputData0, (-1, 4) )
#
outputData1 = outputData[1].reshape(1,output1Size)
scores = np.reshape( outputData1, (-1, 2))
边界框坐标是相对于每个网格位置的,因此需要进行后处理,将每个网格位置的绝对坐标添加到边界框结果中。以下 Python 代码以矢量化方式实现了这一点,以保持最佳性能:
""" Get original face boxes """
gy = np.arange(0,output0Height)
gx = np.arange(0,output0Width)
[x,y] = np.meshgrid(gx,gy)
x = x.ravel()*4
y = y.ravel()*4
bboxes[:,0] = bboxes[:,0] + x
bboxes[:,1] = bboxes[:,1] + y
bboxes[:,2] = bboxes[:,2] + x
bboxes[:,3] = bboxes[:,3] + y
每个网格位置的两个分数结果对应于与不存在和存在的边界框相关联的分数。这两个结果需要归一化为总和为 1.0 的概率分布。我们使用 softmax 函数来执行这一步。更具体地说,我们使用了一个特殊版本的 softwax,softmax_2,它执行 2 类归一化的几次迭代 (160x90)。一旦归一化,我们只保留边界框出现的概率高于某个阈值的结果。
""" Run softmax """
softmax = softmax_2( scores )

""" Only keep faces for which prob is above detection threshold """
prob = softmax[:,1]
keep_idx = prob.ravel() > self.detThreshold
bboxes = bboxes[ keep_idx, : ]
bboxes = np.array( bboxes, dtype=np.float32 )
prob = prob[ keep_idx ]
此时,仍有许多边界框,其中大部分是彼此的重复(重叠实体)。为了去除这些重复,使用了非最大抑制算法,该算法测量每个边界框相对于彼此的重叠(IOU)。
""" Perform Non-Maxima Suppression """
face_indices = []
if ( len(bboxes) > 0 ):
   face_indices = nms_boxes( bboxes, prob, self.nmsThreshold );
faces = bboxes[face_indices]
最后一步是将检测到的人脸坐标缩放回原始输入图像大小。对于这一步,我没有以矢量化风格进行编码,但这应该可以忽略不计,因为我们通常应该有少于十几个面孔。
# extract bounding box for each face
for i, face in enumerate(faces):
   xmin = max(face[0] * scale_w, 0 )
   ymin = max(face[1] * scale_h, 0 )
   xmax = min(face[2] * scale_w, imgWidth )
   ymax = min(face[3] * scale_h, imgHeight )
   faces[i] = ( int(xmin),int(ymin),int(xmax),int(ymax) )
留给读者作为练习,以向量化的形式重新编码本节。请在下面的评论中分享您的实施。
上面所有的代码都被封装在了下面的类中:
vitis_ai_vart/facedetect.py
这使得演示脚本更易于编码和阅读。例如,以下是人脸检测示例的代码摘录:
...
import runner
from vitis_ai_vart.facedetect import FaceDetect
...
# Initialize Vitis-AI/DPU based face detector
dpu = runner.Runner("/usr/share/vitis_ai_library/models/densebox_640_360")[0]
dpu_face_detector = FaceDetect(dpu,detThreshold,nmsThreshold)
dpu_face_detector.start()
...
while True:
   ...
   faces = dpu_face_detector.process(frame)
   ...
# Stop the face detector
dpu_face_detector.stop()
del dpu
人脸追踪
为了实现人脸跟踪,人脸检测之后是一个简单的基于质心的对象跟踪算法。对于每个检测到的人脸,计算边界框的质心,并逐帧跟踪。有关此跟踪实现的更多详细信息,请参阅 PyImageSearch.com 上的原始教程:
Adrian Rosebrock,使用 OpenCV 进行简单对象跟踪,PyImageSearch,https: //www.pyimagesearch.com/2018/07/23/simple-object-tracking-with-opencv/ 于 2020 年 6 月 15 日访问
单线程与多线程
单线程演示脚本的主要流程如下图所示,其中“Worker”指的是我们的“Face Detection”和“Face Tracking”应用示例。

单线程实现的最大帧率受限于整个应用流水线的总执行时间:Capture + Worker + Display。这并不理想,因为我们知道 CPU 在等待来自 USB 摄像头的新帧时可能处于空闲状态,并且肯定会等待 DPU 完成每个内核的执行。
为了提高帧速率,还提供了一个多线程实现,它将应用程序分解为三个主要任务:
任务通过同步队列相互通信。
下一个简化图说明了每个任务如何可以并行开始执行。

为 CaptureTask 和 DisplayTask 线程提供了一个线程,而为 WorkerTask 提供了用户可配置数量的线程,允许对 DPU 的多个请求进行流水线化。
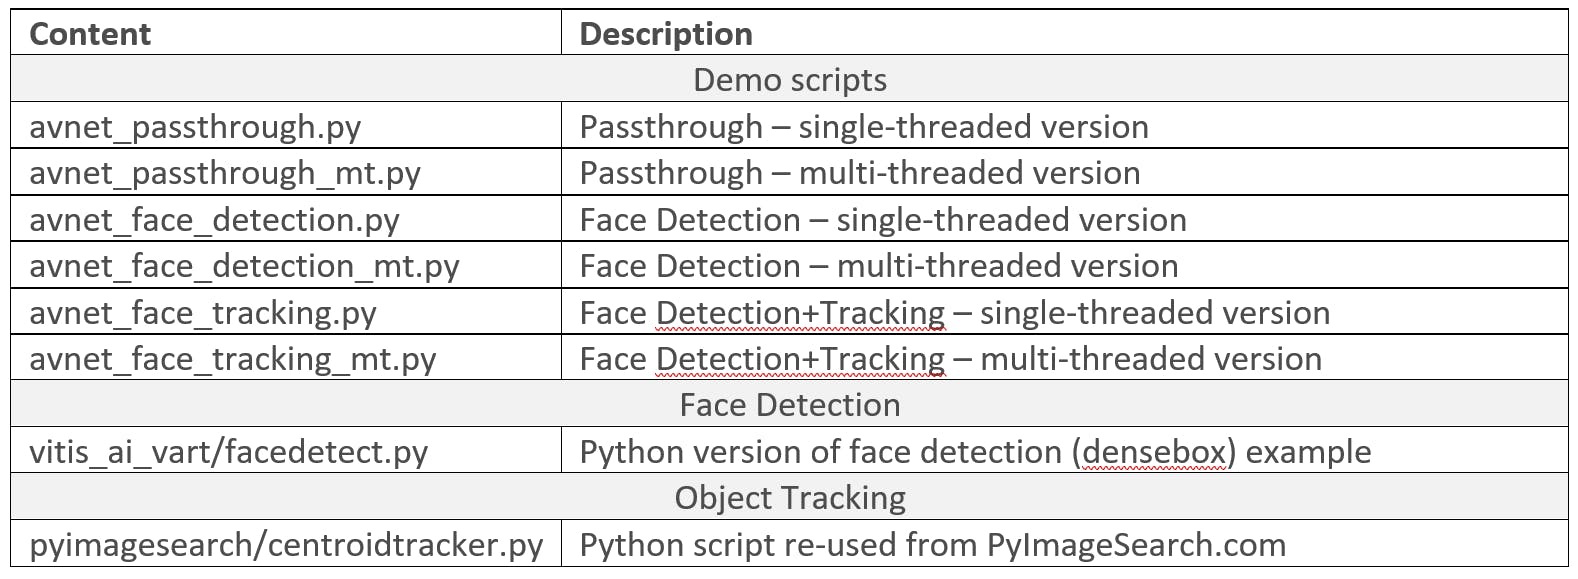
下表概述了本教程提供的 Python 脚本。

有关创建支持 Vitis-AI 1.1 的平台的详细说明,请参阅“Avnet Vitis 平台的 Vitis-AI 1.1 流程”2 部分教程:
https://www.hackster.io/AlbertaBeef/vitis-ai-1-1-flow-for-avnet-vitis-platforms-part-1-007b0e
https://www.hackster.io/AlbertaBeef/vitis-ai-1-1-flow-for-avnet-vitis-platforms-part-2-f18be4
有关创建支持 Vitis-AI 1.1 的 Ultra96-V2 平台的快速说明,请执行以下步骤:
1) 下载并解压以下预构建 SD 卡映像
2) 使用 Balena Etcher 将“Avnet-ULTRA96V2-Vitis-AI-1-1-2020-05-15.img”映像编程到 16GB micro SD 卡
3) 下载 Vitis-AI 1.1 教程的以下解决方案存档,并解压到 micro SD 卡的 BOOT 分区:
4) 使用 SD 卡启动 Ultra96-V2 开发板
5) 对 WAYLAND 桌面进行如下配置,可以改变显示器的分辨率(详见 Vitis-AI 1.1 教程)
$ cd /mnt/runtime/WAYLAND
$ source ./install.sh
$ cat weston_append.ini >> /etc/xdg/weston/weston.ini
$ source ./change_resolution_1920x1080.sh
6)对VART运行时进行如下配置
$ cd /mnt/runtime/VART
$ source ./install.sh
$ cd /mnt/runtime
$ dpkg -i vitis_ai_model_ULTRA96V2_2019.2-r1.1.1.deb
要验证支持 Vitis-AI 1.1 的平台,请执行以下步骤:
7)更改为较低的分辨率,例如1280x720
$ source /mnt/runtime/WAYLAND/change_resolution_1280x720.sh
8)定义DISPLAY环境变量
$ export DISPLAY=:0.0
9)运行C++版本的人脸检测示例
$ cd /mnt/Vitis-AI-Library/overview/samples/facedetect
$ ./test_video_facedetect densebox_640_360 0
本教程的文件可以在 Avnet github 存储库中找到:
https://github.com/Avnet/face_py_vart
在 Ultra96-V2 嵌入式平台上启用以太网连接后,使用“pip3 install ...”安装 Python 包:
$ cd /mnt
$ git clone https://github.com/Avnet/face_py_vart
如果您的嵌入式平台上没有可用的以太网连接,请从存储库下载教程文件:
然后,将其复制到 SD 卡的 BOOT 分区,在名为“face_py_vart”的目录下。
本教程具有以下项目结构:
/mnt/face_py_vart/
│
│ avnet_face_detection.py
│ avnet_face_detection_mt.py
│ avnet_face_tracking.py
│ avnet_face_tracking_mt.py
│ avnet_passthrough.py
│ avnet_passthrough_mt.py
│
├───pyimagesearch
│ │ centroidtracker.py
│ │ __init__.py
│ └───__pycache__
│
└───vitis_ai_vart
│ facedetect.py
│ __init__.py
└───__pycache__
“avnet_*.py”脚本是主要的演示脚本。
“vitis_ai_vart”目录包含基于 VART 的人脸检测的 Python 实现。
“pyimagesearch”目录包含来自 PyImageSearch.com 的重用质心跟踪代码
本教程需要以下 Python 包。

在 Ultra96-V2 嵌入式平台上启用以太网连接后,使用“pip3 install ...”安装 Python 包:
$ pip3 install imutils
如果您的嵌入式平台上没有可用的以太网连接,请从以下网站下载“imutils.0.5.3.tar.gz”包:
然后,将其复制到您的 SD 卡,并使用以下命令进行安装:
$ pip3 install imutils.0.5.3.tar.gz
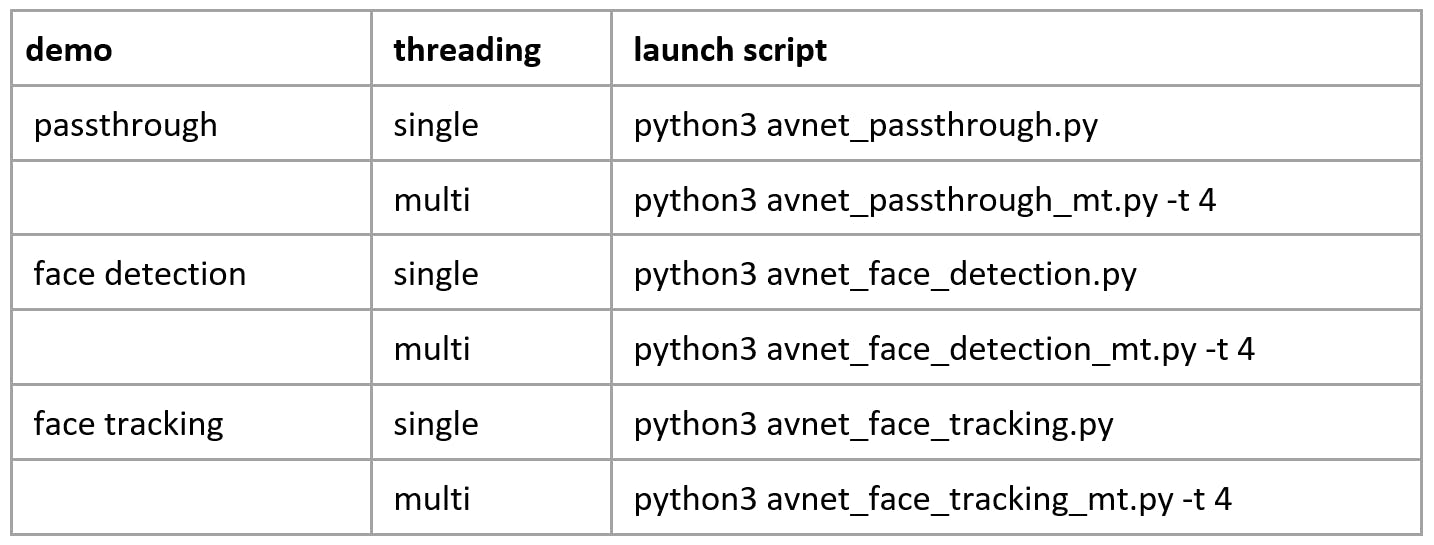
提供了以下三个演示的 Python 脚本,每个演示都有一个单线程和多线程实现:

要在本教程中使用 Python 脚本,请导航到您在 SD 卡的 BOOT 分区上提取的“face_py_vart”目录:
$ cd /mnt/face_py_vart
为了获得有关如何使用每个演示 Python 脚本的帮助,请使用“-h”选项,如下所述:
$ python3 avnet_passthrough_mt.py -h
usage: avnet_passthrough_mt.py [-h] [-i INPUT] [-t THREADS]

optional arguments:
   -h, --help            show this help message and exit
   -i INPUT, --input INPUT
                         input camera identifier (default = 0)
   -t THREADS, --threads THREADS
                         number of worker threads (default = 4)
$ python3 avnet_face_detection_mt.py -h
usage: avnet_face_detection_mt.py [-h] [-i INPUT] [-d DETTHRESHOLD] [-n NMSTHRESHOLD] [-t THREADS]

optional arguments:
   -h, --help            show this help message and exit
   -i INPUT, --input INPUT
                         input camera identifier (default = 0)
   -d DETTHRESHOLD, --detthreshold DETTHRESHOLD
                         face detector softmax threshold (default = 0.55)
   -n NMSTHRESHOLD, --nmsthreshold NMSTHRESHOLD
                         face detector NMS threshold (default = 0.35)
   -t THREADS, --threads THREADS
                         number of worker threads (default = 4)
$ python3 avnet_face_tracking_mt.py -h
usage: avnet_face_tracking_mt.py [-h] [-i INPUT] [-d DETTHRESHOLD] [-n NMSTHRESHOLD] [-t THREADS]

optional arguments:
   -h, --help            show this help message and exit
   -i INPUT, --input INPUT
                         input camera identifier (default = 0)
   -d DETTHRESHOLD, --detthreshold DETTHRESHOLD
                         face detector softmax threshold (default = 0.55)
   -n NMSTHRESHOLD, --nmsthreshold NMSTHRESHOLD
                         face detector NMS threshold (default = 0.35)
   -t THREADS, --threads THREADS
                         number of worker threads (default = 4)
人脸检测
启动多线程人脸检测 Python 脚本:
$ python3 avnet_face_detection_mt.py -i 0 -d 0.55 -n 0.35 -t 4
人脸追踪
启动多线程人脸跟踪 Python 脚本:
$ python3 avnet_face_tracking_mt.py -i 0 -d 0.55 -n 0.35 -t 4
试验参数
如果您为一个独特的人脸检测到重复的 ROI,您可以尝试使用“-d 0.90”命令行参数将检测阈值detThreshold增加到更高的值。
基于质心的对象跟踪器允许检测到的人脸消失一定数量的帧,这可以在 pyimageserach/centroidtracker.py 脚本中更改。这允许暂时“丢失”的面孔在重新出现时保持其关联的“id”。在“pyimagesearch/centroidtracker.py”脚本中定义了面部被暂时丢失的帧数 maxDisappeared :
class CentroidTracker():
   def __init__(self, maxDisappeared=20):
本教程介绍了如何从 Xilinx Model Zoo 访问预训练的 densebox 模型以在 python 中进行人脸检测。
这个基于 python 的示例增加了一个简单的对象跟踪算法。
最后,采用多线程实现,更好地利用 CPU 和 DPU(硬件 AI 引擎),以实现更高的吞吐量。
我希望本教程将作为进一步探索的基础!
声明:本文内容及配图由入驻作者撰写或者入驻合作网站授权转载。文章观点仅代表作者本人,不代表电子发烧友网立场。文章及其配图仅供工程师学习之用,如有内容侵权或者其他违规问题,请联系本站处理。 举报投诉
全部0条评论

快来发表一下你的评论吧 !